
Radiant Lone Star Quilt
(Strip-Pieced Diamond Star)
1) Understanding the Design First (so construction makes sense)
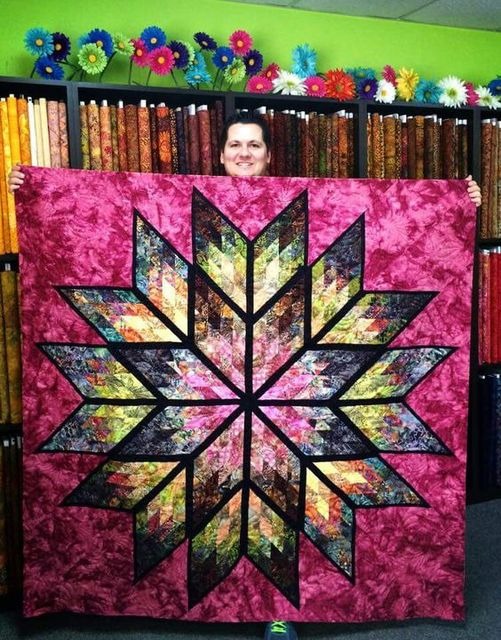
This quilt is built around a single large 8-point star made from diamond units. Each point of the star is made from strip-pieced fabric sets, which means you sew long strips together first, then cut them into diamond shapes. When arranged from dark to light (or cool to warm), the diamonds create that beautiful radiating gradient you see in the photo.
The star sits inside a square background, which frames and highlights it. The strong contrast between the dark star edges and the bright center makes the design dramatic and modern.
2) Choose Your Finished Size
A common and manageable size for this style is a throw quilt around 60″ × 60″, which matches the proportions in the image. The Lone Star block itself usually finishes around 45″–50″ wide, and the background borders bring it up to the final size.
You can scale the quilt larger or smaller by adjusting strip width and border size, but the method stays exactly the same.
3) Fabric Planning (this is where the magic happens)
You need three main fabric groups:
Star Fabrics (Gradient Set)
Choose 8–10 fabrics that gradually shift in color or value (dark → medium → light). Batiks work beautifully for this because of their subtle texture. Arrange them in order before sewing — this controls the glowing effect.
Background Fabric
A bold solid or tonal print (like the deep pink in the photo) makes the star pop. You’ll need several yards depending on final size.
Accent / Outline Fabric (Optional but recommended)
The dark edges around each diamond in the photo come from high-contrast fabric placement. If you want that sharp, defined star shape, include darker fabrics at the outer edges of your strip set.
4) Cutting the Strips (foundation of the star)
Cut 8–10 fabric strips, each 2½” wide × width of fabric (WOF). Keep them in the gradient order you planned.
Example layout from outer edge → center:
Dark plum → deep red → rust → orange → gold → yellow → light gold → pale cream
The number of strips controls how many color “rings” appear in the star.
5) Sewing the Strip Sets
Sew all your strips together lengthwise in the planned color order to make one wide fabric panel. Press seams in one direction.
Now subcut this panel into 60° diamond strips using a ruler with a 60° angle line (or a specialty 60° triangle ruler). These diamonds will become the star points.
Accuracy matters here — cut carefully so all diamonds are identical.
6) Building the Star Points
Each star point is made from one strip-set diamond. You will need 8 large diamonds total.
Lay them out on a design wall, rotating them so the colors radiate outward symmetrically. This is where the star suddenly appears — very satisfying moment!
Sew the diamonds together in pairs first, then join pairs into halves, and finally sew the two halves together to complete the full star.
Because you’re working with bias edges (angled cuts), handle gently and avoid stretching.
7) Squaring the Star
Once sewn, your star will not yet be square. You’ll trim the sides by adding setting triangles.
Cut 4 large background triangles and sew one to each side of the star. This turns the star into a square quilt center. Then add 4 corner triangles to fill the remaining gaps.
After pressing, trim the entire unit so it becomes a neat square.
8) Adding the Background Borders
To match the look in the photo, add wide background borders on all four sides. This gives the Lone Star room to breathe and makes it feel like a medallion quilt.
Measure the quilt center first, then cut borders to fit (don’t just sew long strips and trim later — measuring prevents waves).
9) Quilting Ideas (to enhance the star)
This design looks amazing with quilting that follows the star shape:
Stitch in the ditch along diamond seams
Echo quilting inside each diamond ring
Radiating straight lines from the center
Free-motion feathers or swirls in the background
The more the quilting contrasts between star and background, the more the star “floats.”
10) Binding and Finishing
A dark binding (black, deep plum, navy) frames the star dramatically. Trim, bind, label, and you’re done with a quilt that looks complex but is built from simple strip piecing.
Quick Summary
Quilt Name: Radiant Lone Star Quilt
Technique: Strip piecing + diamond construction
Skill Level: Confident beginner to intermediate
Key Feature: Color-gradient diamonds forming an 8-point star