
Modern Harlequin Diamonds Quilt
Understanding the Design
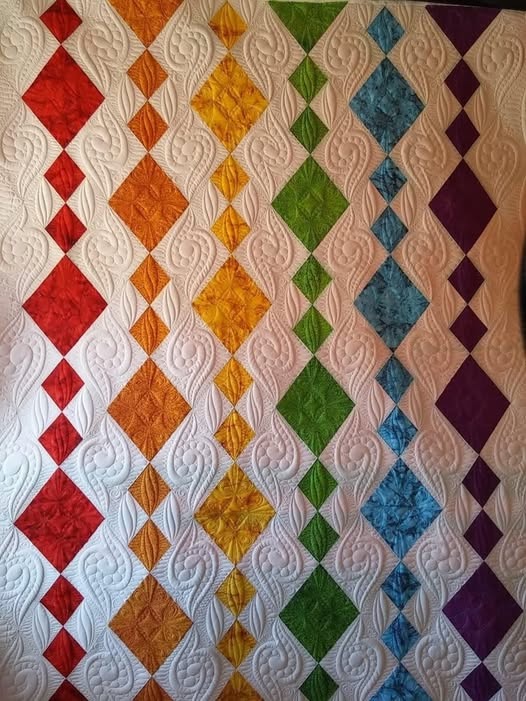
The quilt is made from diamond blocks set in vertical rows. Each row features a single color family, creating a rainbow stripe effect. Between the diamond columns are white background strips, which give the quilt breathing room and make the colors pop. The diamonds are all the same size — consistency is what gives the quilt its modern, graphic look.
2) Choose Your Finished Size
A layout similar to the photo works beautifully as a throw or twin-size quilt.
Example finished size:
-
Width: 60″
-
Height: 72″
This size allows space for multiple vertical diamond columns plus background strips. You can adjust width by adding or removing color columns.
3) Fabric Planning
You’ll need two main groups:
🌈 Diamond Fabrics (Color Columns)
Choose 6–7 colors arranged in rainbow order:
Red, Orange, Yellow, Green, Teal/Blue, Purple
Each column uses variations of the same color (light, medium, dark batiks or prints work beautifully).
🤍 Background Fabric
A solid or tone-on-tone white/off-white. This fabric forms the negative space and makes the diamonds stand out.
4) Cutting the Diamonds (the key unit)
Diamonds are cut using a 60° ruler (same angle used for hexagons and tumbling blocks).
For a balanced size, cut diamonds with:
-
Finished height: 6″
-
Unfinished cut height: about 6½”
You will need multiple diamonds per column. For a 72″ tall quilt, plan about 10–11 diamonds per column.
Cut all diamonds carefully with the same orientation so the fabric grain stays consistent.
5) Creating Diamond Columns
Lay out one column of diamonds in a single color family. Rotate each diamond so the points meet vertically.
Sew diamonds together point to point to form a long vertical strip. Press seams open to reduce bulk.
Make one full column per color. Keep columns organized so the rainbow order stays consistent.
6) Adding Background Side Triangles
Diamonds don’t have straight sides, so we add background setting triangles to each side of the column to make it straight.
Using your 60° ruler, cut half-diamond triangles from background fabric. Sew one triangle to each side of every diamond in the column. When finished, each column becomes a straight-edged vertical panel.
Trim the sides so the column edges are straight.
7) Assembling the Quilt Top
Alternate diamond column → background strip → diamond column → background strip.
Background strips can be cut 2½”–4½” wide depending on how much white space you want. The quilt in the photo uses fairly generous spacing, giving it a modern airy feel.
Sew all columns and background strips together into one quilt top.
8) Top and Bottom Edges
Because diamonds create zigzag edges at the top and bottom, trim the quilt straight by adding background triangles to fill gaps. Then square up the quilt.
9) Quilting (this is what gives the flowing look)
The quilting in the photo uses curved, leaf-like motifs that flow vertically between the diamonds. This softens the sharp geometry of the diamonds and adds elegance.
Great quilting options:
✨ Vertical feather plumes
✨ Curved echo lines following diamond edges
✨ Free-motion swirls in the white spaces
✨ Straight-line quilting inside diamonds, curves in background
Contrast between geometric piecing and organic quilting creates visual depth.
10) Binding and Finish
A dark binding (charcoal, navy, or deep purple) frames the quilt nicely, or you can match the background for a seamless edge.
Add label, wash, and enjoy a quilt that looks complex but is built from one repeated shape.
✨ Quick Summary
Quilt Name: Modern Harlequin Diamonds Quilt
Technique: Diamond piecing with 60° ruler
Layout: Vertical color-gradient columns
Skill Level: Confident beginner to intermediate
Design Style: Modern, graphic, high contrast