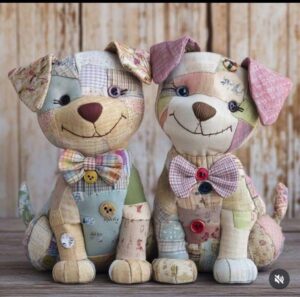
Patchwork Style Dog Dolls
These patchwork style dog dolls are adorable! Below is a step-by-step guide to making this type of teddy bear in patchwork-style fabric, ideal for artisan seamstresses and quilting lovers:
🧵 MATERIALS NEEDED
Scraps of various fabrics (country style, floral, plaid, striped, etc.)
Sewing thread (neutral or matching color)
Acrylic filling (silicon fiber)
Assorted buttons (for eyes and decorations)
Felt (optional for nose and details)
Needle and pins
Fabric scissors
Sewing machine (or hand sewing)
Printed templates of the dog (I will describe how to draw below)
✂️ STEP BY STEP
1. MAKE THE TEMPLATES
Draw the following parts of the dog on paper or cardboard:
Head (half-circumference oval)
Muzzle
Body (large teardrop shape)
Ears (2 templates different, drooping)
Paws (front and back)
Tail
Bow tie
Tip: If you want, I can also generate a PDF template for printing.
2. CHOOSE AND CUT THE FABRICS (Patchwork)
Choose different and harmonious fabrics.
Sew small rectangles/squares together to form patchwork “panels”.
From these panels, cut the parts of the dog (body, head, paws, etc.) using the templates.
3. SEW THE PARTS
Sew the ears, leaving an opening to turn.
Do the same with the body, head, and paws.
Turn all the pieces right side out and stuff with stuffing.
Seal with invisible stitch.
4. ASSEMBLY OF THE BODY
Sew the paws to the body.
Sew the head to the body with a firm stitch (you can reinforce it with hot glue, if you prefer).
Sew or glue the tail to the back.
5. FACE DETAILS
Eyes: Sew on two small, colorful buttons.
Nose: Can be made of felt or embroidered.
Mouth: Embroider with a backstitch using black or brown thread.
Ears: Sew on the sides of the head.
6. ACCESSORIES
Make a bow tie with plaid or striped fabric.
Sew decorative buttons on the belly.
You can also embroider small details or labels.
7. FINISHING
Make sure all the seams are secure.
Touch up with hot glue if necessary.
If you want to give it an aged touch, apply dry blush or diluted fabric paint.