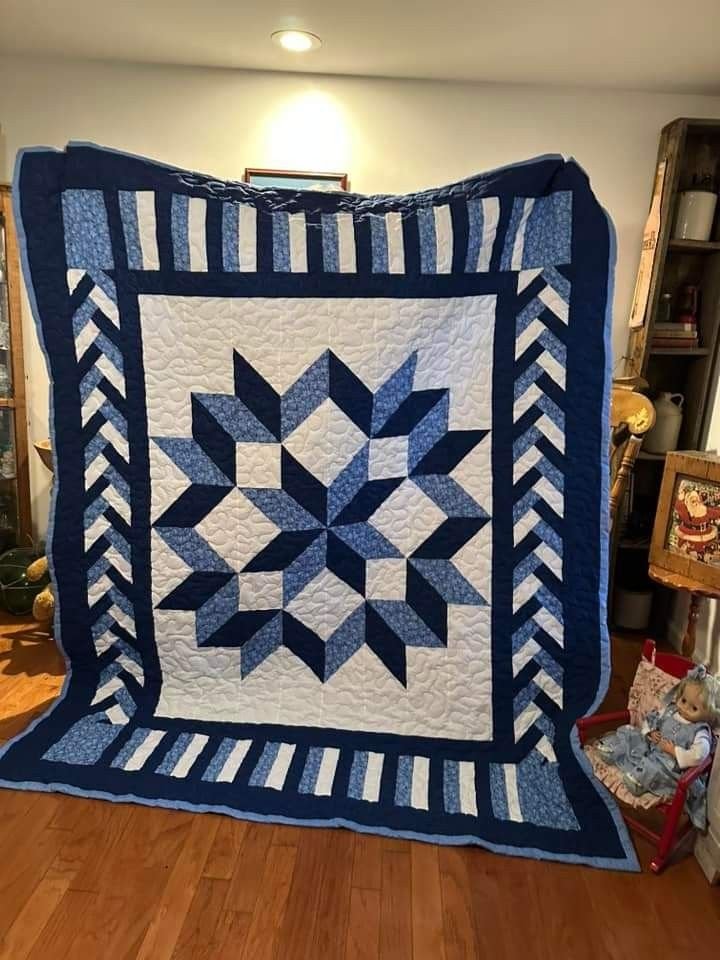
Carpenter’s Star Quilt
Queen Size Carpenter’s Star Quilt (approx. 88 x 100 inches / 223 x 254 cm).
Unlike a rag quilt, a traditional quilt uses a 1/4-inch seam allowance, pieced top blocks, inner/outer borders, separate batting, and backing fabric.
Quilt Anatomy & Dimensions
-
Center Star Block: 60 x 60 inches (A 6×6 grid of 10-inch finished blocks)
-
Solid Squares: Background (White) and Star Accents (Dark Navy / Medium Blue)
-
Half-Square Triangles (HSTs): Two-color HST combinations generating the star points
-
-
Inner Border (Solid Navy): 2 inches wide
-
Pieced Piano Key / Braided Border: 6 inches wide
-
Outer Border & Binding (Dark Navy & Light Blue): 4 inches wide
Fabric Requirements (Assuming 42″ Printable Fabric Width)
| Fabric Role / Color | Design Function | Total Yardage Needed |
| Background (White/Off-White) | Star background & border spacers | 3.5 yards |
| Dark Blue (Navy) | Star points, inner border, outer border & binding | 4.5 yards |
| Medium Blue (Patterned/Floral) | Star body accents & pieced border keys | 2.5 yards |
| Light Blue (Patterned/Tone-on-Tone) | Star body accents, piano keys & outer edge trim | 2 yards |
| Quilt Backing | Full single-sheet or pieced backing | 8 yards (or 2.75 yards of 108″ wide fabric) |
| Batting | Queen size (at least 95 x 108 inches) | 1 Queen Batting Roll |
Cutting Instructions for the Central Star (60″ x 60″)
To build the 6×6 grid (36 total 10.5″ unfinished squares):
-
Solid Background Squares: Cut (10) 10.5″ x 10.5″ squares from White.
-
Solid Star Center Squares: Cut (2) 10.5″ x 10.5″ squares from Dark Navy, (2) from Medium Blue, and (2) from Light Blue.
-
Half-Square Triangles (HSTs): Cut (10) 11.5″ x 11.5″ squares of Background and matching 11.5″ squares of blues to pair up, draw diagonal lines, sew 1/4″ on both sides, cut down the center, and trim down to 10.5″ x 10.5″.
Key Assembly Tips
-
Square Up Your HSTs: The precision of the Carpenter’s Star relies entirely on sharp 45-degree points. Always trim your Half-Square Triangles precisely to 10.5″ before joining them.
-
Press Seams Open or Nesting: Press seams toward the darker fabrics, or press them open to reduce bulk where multiple diagonal star points meet at the center intersections.
-
Borders First, Braids Second: Assemble the central star top completely, attach the solid inner navy border, and then build the top/bottom piano key strips and left/right chevron border strips separately before sewing them onto the center panel.
-
Project Overview
-
Skill Level: Intermediate
-
Finished Size: Queen Size (approx. 88″ x 100″ / 223 cm x 254 cm)
-
Block Units: 10″ Finished Half-Square Triangles (HSTs) and Solid Squares
-
Grid Layout: 6×6 Center Grid (36 blocks total) + Borders
Fabric Requirements (42″ Width)
Fabric Color / Pattern Function Total Yardage Fabric A White / Off-White Solid Star Background & Border Spacers 3.5 Yards Fabric B Dark Navy Blue Outer Star Points, Inner Border, Outer Border & Binding 4.5 Yards Fabric C Medium Blue Floral/Print Middle Star Ring & Chevron/Piano Key Borders 2.5 Yards Fabric D Light Blue Print/Tone-on-Tone Inner Star Accents & Border Keys 2 Yards Backing Choice Fabric Quilt Backing 8 Yards (or 2.75 yards of 108″ wide) Batting 100% Cotton or Blend Mid-layer Insulation 1 Queen Roll (min. 95″ x 108″) Step 1: Cutting the Central Star Grid
All central units are cut to 10.5″ x 10.5″ to finish at 10″ x 10″ in the quilt.
1. Solid Squares (10.5″ x 10.5″)
-
Fabric A (White): Cut (10) 10.5″ squares (Corners and side background blocks)
-
Fabric B (Navy): Cut (2) 10.5″ squares
-
Fabric C (Medium Blue): Cut (2) 10.5″ squares
-
Fabric D (Light Blue): Cut (2) 10.5″ squares
2. Half-Square Triangles (HSTs)
To make HSTs using the 2-at-a-time method, cut oversized 11.5″ x 11.5″ squares, pair them, and trim down to 10.5″ x 10.5″:
-
A + B Pairs: Cut (5) 11.5″ squares of Fabric A and (5) of Fabric B $\rightarrow$ Yields 10 HSTs
-
A + C Pairs: Cut (3) 11.5″ squares of Fabric A and (3) of Fabric C $\rightarrow$ Yields 6 HSTs
-
B + C Pairs: Cut (1) 11.5″ square of Fabric B and (1) of Fabric C $\rightarrow$ Yields 2 HSTs
-
B + D Pairs: Cut (1) 11.5″ square of Fabric B and (1) of Fabric D $\rightarrow$ Yields 2 HSTs
Step 2: Sewing the Central Star (6×6 Grid)
-
Make the HSTs:
-
Place two 11.5″ contrasting squares right sides together.
-
Draw a diagonal line from corner to corner.
-
Sew 1/4 inch away from the drawn line on both sides.
-
Cut along the center drawn line to yield 2 HSTs.
-
Press seams toward the darker fabric and trim/square up precisely to 10.5″ x 10.5″.
-
-
Assemble the Grid:
-
Lay out the 36 blocks into 6 rows of 6 blocks according to the Carpenter’s Star pattern (4 white corners, diamond star center, radiating outer points).
-
Sew blocks into 6 horizontal rows using a standard 1/4-inch seam allowance.
-
Nest row seams alternately (Row 1 left, Row 2 right) and join the 6 rows together.
-
Finished Center Unit: 60.5″ x 60.5″ (Unfinished).
-
Step 3: Assembling the Custom Borders
1. Inner Border (Fabric B – Dark Navy)
-
Cut (4) strips at 2.5″ x width of fabric (WOF).
-
Attach left and right side borders first (60.5″), then top and bottom borders (64.5″).
2. Pieced Border (Chevron Sides + Piano Keys Top/Bottom)
-
Sides (Chevron/Braided): Piece 2.5″ x 6.5″ rectangles of Fabric B, C, and D at 45-degree angles to form vertical chevron strips. Sew to the left and right sides.
-
Top & Bottom (Piano Keys): Piece alternating 2.5″ x 6.5″ strips of Fabric A, B, C, and D horizontally. Sew to top and bottom.
3. Outer Border (Fabric B – Dark Navy)
-
Cut (8) 4.5″ x WOF strips of Fabric B.
-
Piece together and attach around all four outer edges to frame the quilt.
Step 4: Quilting & Finishing
-
Basting: Layer the backing fabric (wrong side up), batting, and finished quilt top (right side up). Pin or spray baste securely.
-
Quilting: Perform custom longarm or machine quilting (the example photo uses a swirling edge-to-edge floral/feather pantograph).
-
Binding: Cut (10) 2.5″ x WOF binding strips from Fabric B (or Fabric D for contrast accent). Join with diagonal seams, fold in half lengthwise, press, and sew to the outer perimeter.
-
Here is the exact Block-by-Block Diagram Layout for the 36 central squares (6×6 Grid) of the Carpenter’s Star.
Fabric Letter Key
-
A: Background (White / Off-White)
-
B: Dark Navy Blue
-
C: Medium Blue Floral / Print
-
D: Light Blue Print / Accent
-
Slash (
/): Indicates a Half-Square Triangle (HST). The first letter is the top-left triangle, and the second letter is the bottom-right triangle.
The 6×6 Grid Block Map
Row 1: [ A ] [ A ] [ A/B ] [ B/A ] [ A ] [ A ]
Row 2: [ A ] [ A/B ] [ C/B ] [ B/C ] [ B/A ] [ A ]
Row 3: [ B/A ] [ C/B ] [ D ] [ C ] [ B/C ] [ A/B ]
Row 4: [ A/B ] [ B/C ] [ C ] [ D ] [ C/B ] [ B/A ]
Row 5: [ A ] [ B/A ] [ B/C ] [ C/B ] [ A/B ] [ A ]
Row 6: [ A ] [ A ] [ B/A ] [ A/B ] [ A ] [ A ]
HST Orientation & Pressing Checklist
-
Diagonal Alignment:
-
The HSTs in Rows 1 & 2 slant diagonally inward toward the center.
-
The HSTs in Rows 5 & 6 slant diagonally outward, completing the diamond points.
-
-
Center Diamond Focus:
-
Notice how the 4 center squares (Row 3, Cols 3-4 and Row 4, Cols 3-4) consist of two solid
[ D ](Light Blue) and two solid[ C ](Medium Blue) squares to form the inner focal diamond.
-
-
Pressing Direction Strategy:
-
Odd Rows (1, 3, 5): Press all seam allowances to the Left.
-
Even Rows (2, 4, 6): Press all seam allowances to the Right.
-
This ensures every intersection nests automatically when you join the horizontal rows together.
-