
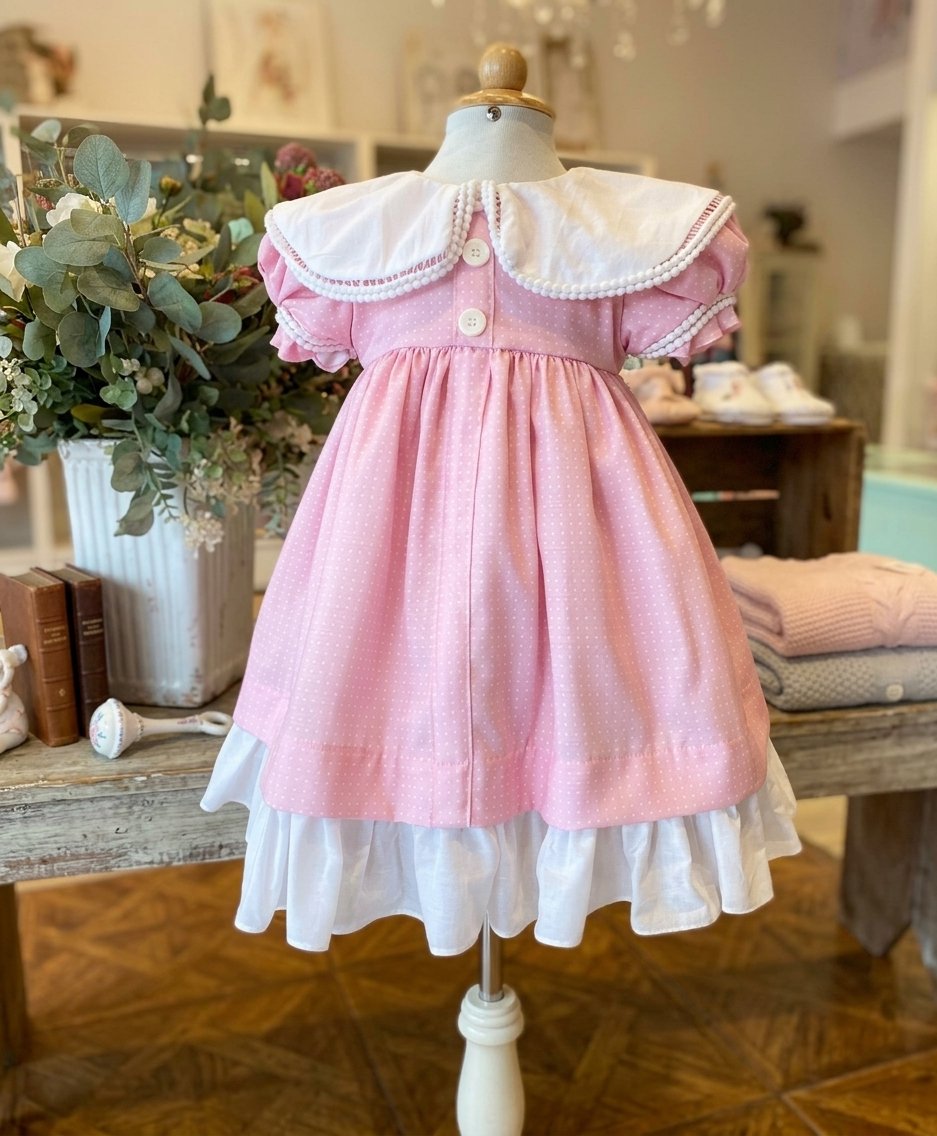
Vintage-Style Baby & Toddler Dress
Vintage-Style Baby & Toddler Dress with Oversized Collar
(Free Sewing Pattern Guide)
Bring timeless charm to your little one’s wardrobe with this classic vintage-style dress. Featuring an oversized Peter Pan collar with pom-pom trim, puffed sleeves, a gathered skirt with a double-layer ruffled hem, and decorative front buttons, this dress is perfect for special occasions, photoshoots, or everyday elegance.
Project Overview
-
Skill Level: Intermediate
-
Format: Step-by-Step Tutorial
-
Sizing: 6 Months – 3 Years
-
Seam Allowance: $1/4$ inch ($6\text{ mm}$) unless otherwise specified
Materials Needed
-
Main Fabric: $1.5 \text{ to } 2 \text{ yards}$ of lightweight cotton (micro-polka dot print, poplin, or linen)
-
Contrast Fabric: $1 \text{ yard}$ of white cotton lawn, voile, or batiste (for collar, lower ruffle, and inner lining)
-
Trim: $1.5 \text{ yards}$ of mini pom-pom ribbon or picot edge lace
-
Notions:
-
$2\text{–}3$ decorative front buttons
-
Invisible zipper or 3 snaps for back closure
-
$1/4\text{-inch}$ elastic for sleeve cuffs
-
Matching thread, sewing machine, fabric marker, and iron
-
Pattern Pieces to Cut
-
Bodice Front: Cut 1 on fold (Main Fabric)
-
Bodice Back: Cut 2 mirrored (Main Fabric)
-
Bodice Lining: Cut 1 Front on fold, Cut 2 Back (Contrast Fabric or Lightweight Cotton)
-
Oversized Collar: Cut 4 total (2 pairs mirrored) (Contrast Fabric)
-
Puff Sleeves: Cut 2 mirrored (Main Fabric)
-
Main Skirt Panel: Cut 2 rectangles ($30″ \times 14″$ for $12\text{–}18\text{M}$ size) (Main Fabric)
-
Lower Hem Ruffle: Cut 2 long strips ($45″ \times 5″$) (Contrast Fabric)
Step-by-Step Sewing Instructions
Step 1: Construct the Oversized Statement Collar
-
Sandwich your pom-pom trim along the outer curved edge of one collar piece, right sides together, facing inward. Baste in place.
-
Place a matching collar piece right side down over the trim and pin around the outer curved edge.
-
Sew along the curve with a $1/4\text{-inch}$ seam allowance.
-
Clip curves and turn right side out. Press with a warm iron. Repeat for the other side of the collar.
Step 2: Prepare and Attach the Bodice Front Placket
-
Create the faux front placket on the Main Bodice Front by folding and pressing a central vertical pleat or sewing decorative topstitching down the center.
-
Hand-sew your decorative front buttons down the center placket.
Step 3: Assemble Bodice and Collar
-
Stitch the shoulder seams of the Main Bodice and the Lining Bodice separately. Press seams open.
-
Baste the prepared collar pieces to the neckline of the Main Bodice right side up, overlapping slightly at the front center.
-
Place the Lining Bodice right sides together over the Main Bodice (sandwiching the collar inside) and sew along the entire neckline.
-
Clip along the neckline curve, turn the lining inside, and press neatly.
Step 4: Attach the Puff Sleeves
-
Run two parallel gathering stitches along the top cap of each sleeve.
-
Pull threads to gather the sleeve cap until it fits the armhole opening of the bodice.
-
Pin sleeves right sides together to the armholes and stitch.
-
Fold the sleeve hem up $1/2$ inch to create a casing, insert elastic to fit the child’s arm comfortably, secure elastic ends, and stitch closed.
Step 5: Sew the Double-Layer Ruffled Skirt
-
Prepare the Contrast Ruffle: Hem the bottom edge of the long white contrast strips. Run two parallel gathering stitches along the top edge and gather evenly to match the width of the main pink skirt.
-
Baste the white ruffle to the bottom inside hem of the main pink skirt panel.
-
Hem the bottom of the main pink skirt so it sits about $2\text{–}3 \text{ inches}$ above the bottom edge of the white ruffle, creating a layered look.
-
Gather the Waist: Run two gathering stitches along the top edge of the assembled skirt and gather evenly to match the bottom width of the bodice.
Step 6: Join Bodice and Skirt
-
Pin the gathered skirt right sides together to the bottom edge of the Main Bodice, ensuring the front placket aligns with the center skirt gather.
-
Stitch across the waistline, trim excess fabric, and press the seam allowances up toward the bodice.
-
Hand-stitch or machine-stitch the lining down over the waist seam for a clean, professional finish inside.
Step 7: Back Closure & Final Hem
-
Insert an invisible zipper down the back center opening or install snap closures along a folded placket.
-
Match side seams from sleeve cuff down to the skirt hem and sew closed on both sides.
-
Give the entire dress a thorough steam-press.
Pro Designer Tips for Your Website Readers:
-
Fabric Choice: Use 100% natural fibers like breathable cotton lawn or heirloom linen for maximum comfort on sensitive toddler skin.
-
Professional Finish: Use pinking shears on inner seams or finish with a serger to prevent fraying during washes.