
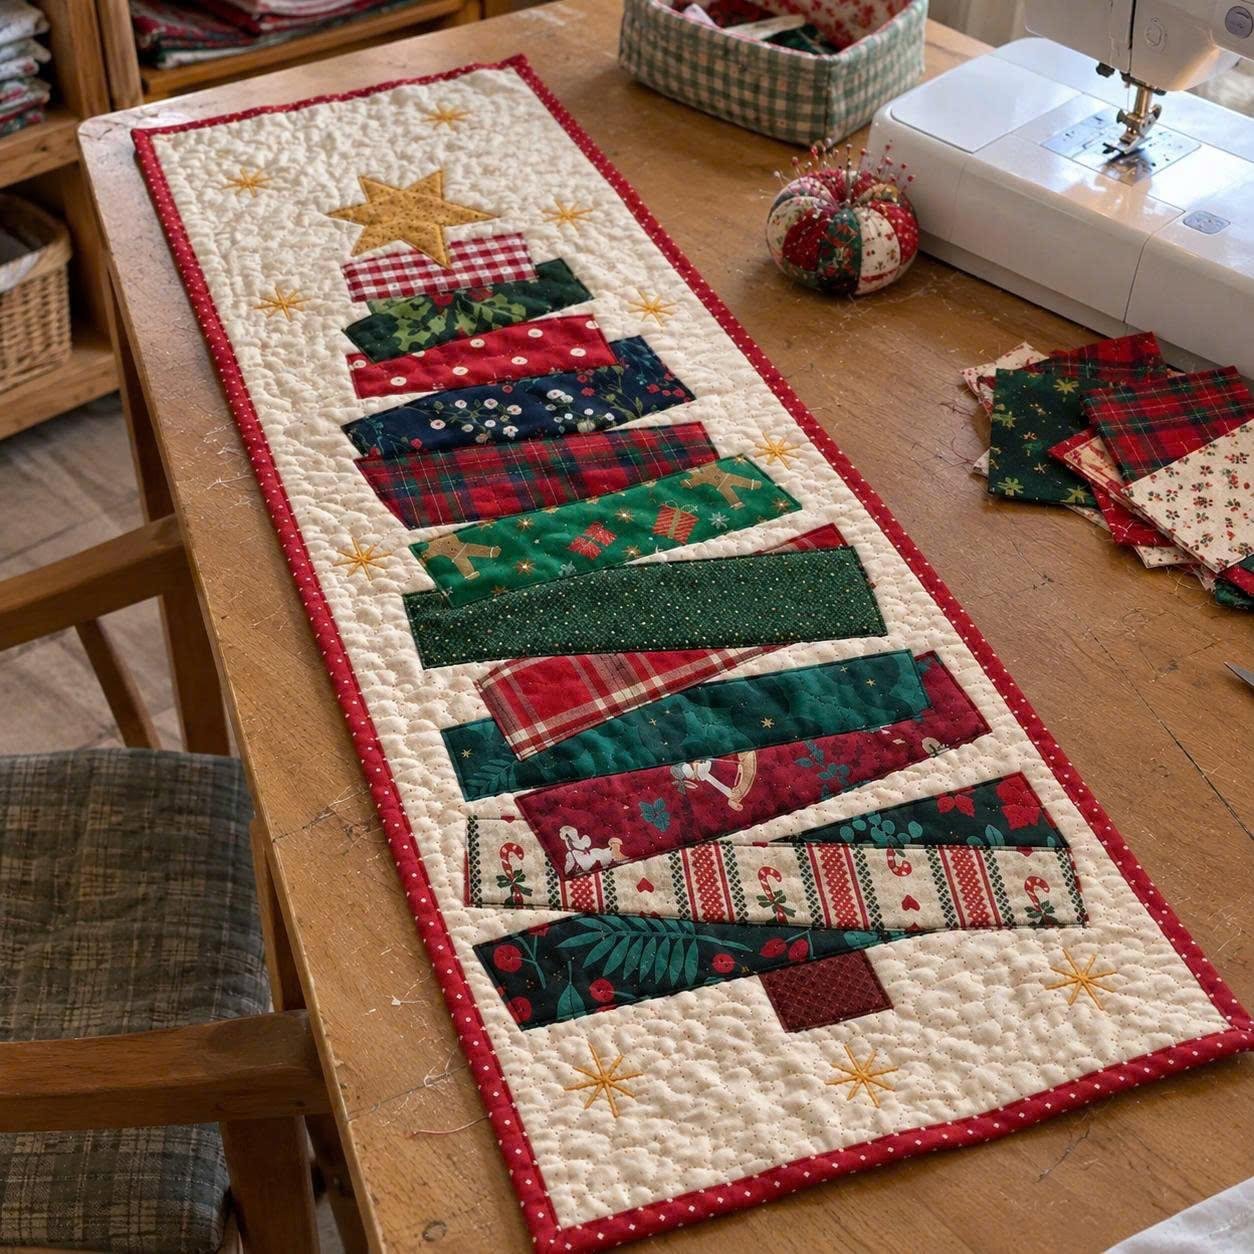
Christmas Tree Patchwork Table Runner
A festive quilting project inspired by your photo, featuring a scrappy fabric Christmas tree, a cream quilted background, decorative starbursts, and red binding.


This tutorial explains how to recreate the table runner shown in your photo using traditional quilting and appliqué techniques. The tree is made from overlapping strips of Christmas fabric in different widths, creating a rustic, scrappy patchwork look.
Materials and supplies
-
Christmas cotton fabrics in red, green, cream, plaid, and festive prints
-
Cream or ivory fabric for the background
-
Red fabric with small white dots for the binding
-
Fabric for the backing
-
Cotton batting
-
Gold embroidery floss for the starbursts
-
Brown fabric for the tree trunk
-
Sewing machine, thread, scissors, rotary cutter, ruler, and cutting mat
-
Quilting pins or clips
-
Iron and ironing board
Step 1: Cut the background pieces
-
Cut one rectangle of cream fabric measuring approximately 16 × 40 inches (40 × 102 cm) for the table runner top.
-
Cut one matching rectangle for the backing.
-
Cut one rectangle of batting in the same size.
-
Press the cream fabric to remove wrinkles.
You can adjust the dimensions to fit your table. The finished runner will be slightly smaller after quilting and binding.
Step 2: Prepare the Christmas tree fabrics

-
Choose 10–12 different Christmas prints.
-
Cut fabric strips of varying widths, approximately 1½–3 inches (4–7.5 cm) wide.
-
Cut the strips into different lengths, from about 5–14 inches (13–36 cm).
-
Arrange them from shortest at the top to longest at the bottom.
-
Mix solid-looking dark greens with red plaid, holly prints, cream Christmas motifs, and turquoise or deep teal fabrics.
Tip: The charm of this design comes from the irregular edges and contrasting fabrics. The strips do not need to be perfectly symmetrical.
Step 3: Create the patchwork tree

-
Place the longest strip at the bottom of the tree and gradually arrange shorter strips above it.
-
Overlap the fabric strips slightly so the edges form an irregular triangular tree shape.
-
Pin the strips temporarily to the cream background.
-
Starting at the bottom, lift each strip and stitch it in place, working upward.
-
Fold under any raw edges that will remain visible, or use a raw-edge appliqué technique with closely spaced stitching.
-
Trim the outer edges of the assembled tree into a loose triangular silhouette.
For the layered appearance in your photo, allow some strips to extend beyond the edges of the strips above them. This gives the tree its handmade, fabric-collage effect.
Step 4: Add the tree trunk and star
-
Cut a small rectangle of brown or burgundy fabric for the trunk.
-
Position it beneath the lowest tree branches and stitch it in place.
-
Draw a five-point star on paper, approximately 3–4 inches (7.5–10 cm) wide.
-
Trace the star onto golden or mustard-colored fabric.
-
Cut the star out and place it at the top of the tree.
-
Stitch around the star using a narrow zigzag stitch or appliqué stitch.
Step 5: Add the decorative gold starbursts

The original design has small golden starbursts scattered around the tree.
-
Thread a hand-sewing needle with gold embroidery floss.
-
Bring the needle up through the cream fabric.
-
Make four to six straight stitches radiating from a central point.
-
Add shorter stitches between the longer rays if desired.
-
Repeat around the tree, leaving enough space between the motifs.
You can also use decorative machine embroidery or simple straight stitches in golden thread.
Step 6: Assemble the quilt sandwich
-
Lay the backing fabric on your work surface with the wrong side facing up.
-
Place the batting on top.
-
Center the patchwork runner top over the batting, right side facing up.
-
Smooth all three layers carefully.
-
Pin or baste the layers together, working from the center outward.
Make sure there are no wrinkles in the backing or batting.
Step 7: Quilt the table runner

-
Quilt the cream background using a meandering or stippling pattern.
-
Work around the tree and star, keeping the stitching consistent.
-
Quilt the tree strips with straight lines or follow their individual shapes.
-
Add quilting to the trunk and star if desired.
-
Secure all thread ends and trim any excess batting and backing.
The dense, small-scale quilting on the cream background helps the colorful tree stand out.
Step 8: Add the red binding
-
Cut red fabric with small white dots into strips approximately 2½ inches (6.5 cm) wide.
-
Join the strips diagonally to create one continuous binding long enough to go around the runner.
-
Fold the binding in half lengthwise, wrong sides together, and press.
-
Sew the raw edges of the binding to the front of the runner.
-
Fold the binding over the raw edge to the back.
-
Hand-stitch or machine-stitch it securely in place.
-
Carefully finish the corners for a neat rectangular border.
Step 9: Final finishing touches
-
Trim loose threads.
-
Press the runner gently with an iron.
-
Check that the binding is even on all sides.
-
Add any final decorative stitches to the star or tree.
-
Lay the runner flat and admire your finished Christmas quilt.

Suggested finished dimensions
| Feature | Approximate measurement |
|---|---|
| Finished runner | 15 × 39 inches (38 × 99 cm) |
| Cream background border | 2–3 inches (5–7.5 cm) |
| Tree height | 27–30 inches (69–76 cm) |
| Tree base width | 11–13 inches (28–33 cm) |
| Binding width, finished | ¼–⅜ inch (0.6–1 cm) |
Important: These are suggested measurements based on the appearance of your reference photo, not exact measurements of the original pattern.
For the closest match, use a variety of Christmas prints rather than making the tree from only solid green fabric. The plaid, holly, stars, and cream-and-red prints are what give this table runner its distinctive traditional Christmas patchwork style.