Flower Bouquet Quilt
DIY Flower Bouquet Quilt: Step-by-Step Appliqué and Patchwork Tutorial
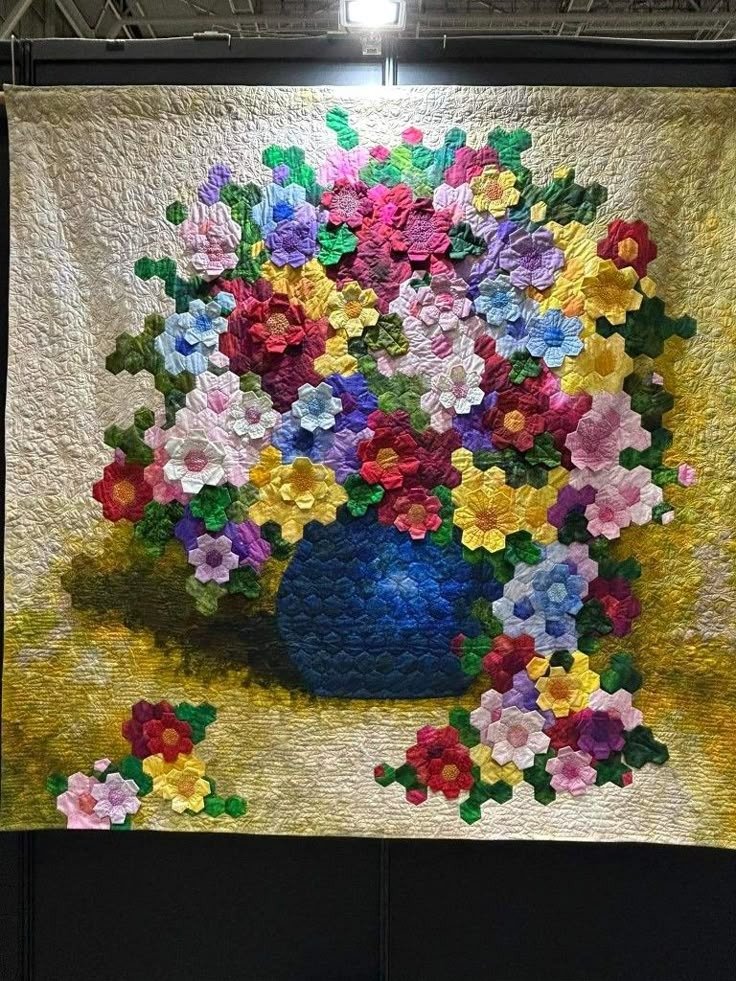
Create a beautiful DIY flower bouquet quilt inspired by a colorful vase overflowing with handmade flowers. This stunning quilt combines hexagon patchwork, appliqué, floral quilting, and vibrant fabric scraps to create a three-dimensional bouquet effect.
The design features a rich blue vase surrounded by layers of colorful flowers and green leaves, all framed by a soft neutral background. It is a wonderful project for quilters who enjoy English paper piecing, hexagon flowers, scrap quilting, and floral appliqué.
The finished piece can be used as a wall hanging, decorative quilt, table topper, or handmade home décor accent.
Materials You Will Need
Before starting your quilt, gather the following supplies.
Fabric
You will need:
- Cream, beige, or light neutral fabric for the background
- Several shades of blue for the vase
- Pink fabric
- Red fabric
- Purple fabric
- Yellow fabric
- White or cream fabric
- Green fabrics for leaves
- Small floral prints for additional detail
- Fabric for the quilt backing
- Quilt batting
- Fabric for the binding
This project is ideal for using small fabric scraps, especially for the flowers.
Sewing Supplies
- Sewing machine
- Rotary cutter
- Cutting mat
- Quilting ruler
- Fabric scissors
- Fabric marking pencil
- Hand-sewing needle
- Sewing thread
- Embroidery thread
- Pins or quilting clips
- Iron and ironing board
- Safety pins or basting spray
- Optional: fusible web
- Optional: quilting ruler with 60-degree markings
Step 1: Decide the Size of Your Quilt
Start by choosing the finished size of your project.
The inspiration piece is a vertically oriented wall quilt, making this style particularly suitable for displaying as artwork.
You could make a:
- Small wall hanging
- Medium decorative quilt
- Large wall quilt
- Table centerpiece
- Pillow panel
A rectangular format works especially well because it allows the bouquet to extend upward while leaving room for flowers spilling around the vase.
Step 2: Choose a Neutral Background
The bouquet looks particularly striking because it sits against a light background.
Choose a fabric such as:
- Cream
- Ivory
- Beige
- Light gold
- Soft gray
- Pale yellow
A solid or subtle tonal print is ideal.
Avoid using a very busy background because the flowers contain many colors and details.
Step 3: Gather Your Flower Fabrics
This is the perfect project for using your colorful scraps.
Create small piles of fabric in different colors.
For example:
Pink Flowers
Use light pink, rose, magenta, and dusty pink.
Purple Flowers
Combine lavender, violet, plum, and deep purple.
Red Flowers
Use scarlet, burgundy, cherry red, and coral.
Yellow Flowers
Combine pale yellow, golden yellow, and mustard.
Blue Flowers
Use sky blue, turquoise, royal blue, and navy.
The more variation you have within each color family, the more dimensional the bouquet will appear.
Step 4: Create the Flower Templates
The flowers in this quilt can be created using hexagon patchwork.
A simple flower can be made from:
- One center hexagon
- Six surrounding hexagons
This creates a classic seven-piece flower block.
You can make the flowers all the same size or combine different sizes for a more natural bouquet.
Step 5: Cut the Hexagon Pieces
Choose the size of your hexagons.
For a detailed flower quilt, smaller hexagons create beautiful intricate flowers.
For a simpler project, use larger hexagons.
Cut paper templates for your chosen size.
Then cut fabric pieces slightly larger than the paper templates so you have enough fabric to fold around the edges.
Step 6: Try English Paper Piecing
English Paper Piecing (EPP) is an excellent technique for creating the flowers.
To make one hexagon:
- Place the paper template on the wrong side of the fabric.
- Fold the fabric edges around the paper.
- Temporarily baste the fabric around the template.
- Repeat for the remaining pieces.
- Arrange six petals around one center.
- Hand-stitch the hexagons together.
- Carefully remove the paper templates when the flower is complete.
Repeat the process to create as many flowers as you need.
Step 7: Create Flowers in Different Colors
Make a variety of flowers.
For example:
- Large pink flowers
- Small purple flowers
- Yellow flowers with contrasting centers
- Red flowers
- White flowers
- Blue flowers
Avoid making every flower identical.
Different combinations of colors and fabrics will make the bouquet look much more natural.
Step 8: Add Contrasting Centers
The flower centers can be made from contrasting fabrics.
For example:
- Pink flower + yellow center
- Purple flower + white center
- Yellow flower + orange center
- Blue flower + white center
- Red flower + yellow center
You can also embroider the center of each flower.
Simple stitches such as:
- French knots
- Straight stitches
- Running stitch
- Small loops
can add beautiful texture.
Step 9: Make the Green Leaves
The leaves provide an important contrast to all of the colorful flowers.
Cut leaf shapes from different green fabrics.
Use:
- Dark green
- Forest green
- Olive
- Emerald
- Light green
- Green prints
Make leaves in several sizes.
Some can be long and narrow, while others can be rounded.
Step 10: Add Leaf Details
To give the leaves more dimension, add a simple embroidered vein down the center.
You can use green embroidery thread in a slightly darker or lighter shade.
A simple running stitch or stem stitch is enough.
You can also quilt the veins later instead of embroidering them.
Step 11: Design the Blue Vase
The vase is the main foundation of the bouquet.
Create a simple vase template from paper.
The shape can include:
- A narrow neck
- Wider shoulders
- A rounded body
- A slightly curved bottom
The inspiration design uses several shades of blue to create the appearance of a textured ceramic vase.
Step 12: Cut the Vase Pieces
Instead of making the vase from one solid piece, divide it into several sections.
Use different blue fabrics for each section.
For example:
- Navy blue
- Royal blue
- Medium blue
- Pale blue
This creates a patchwork appearance and gives the vase more depth.
Step 13: Sew the Vase Together
Join the blue pieces together using a straight stitch.
Press the seams carefully.
Once all the sections are joined, you should have one complete vase shape.
You can add decorative stitching to imitate:
- Ceramic texture
- Curved highlights
- Horizontal bands
- Decorative patterns
Step 14: Add the Vase to the Background
Position the vase near the lower-middle portion of the quilt.
Pin it temporarily.
Check that there is enough room above the vase for the main bouquet.
You can also allow some flowers and leaves to extend below and around the vase, as shown in the inspiration design.
Step 15: Attach the Vase
The vase can be attached using several techniques.
Raw-Edge Appliqué
Place the vase on the background and stitch around the edge.
Turned-Edge Appliqué
Fold the fabric edge under before stitching it down.
Fusible Appliqué
Use fusible web to secure the vase before stitching.
For a beginner-friendly project, fusible appliqué is one of the easiest methods.
Step 16: Begin Arranging the Flowers
Now comes the fun part.
Place the completed flowers around the vase without sewing them yet.
Start with the largest flowers.
Position them near the center of the bouquet.
Then fill the surrounding areas with smaller flowers.
Try to create a triangular or rounded composition so the bouquet feels balanced.
Step 17: Create the Main Bouquet
The inspiration design has a very full bouquet.
Allow flowers to overlap slightly.
Some flowers can sit directly against the vase.
Others can extend outward.
Don’t arrange everything too evenly.
A natural bouquet usually has flowers at different heights and angles.
Step 18: Add the Leaves Between the Flowers
Once the flowers are arranged, fill the gaps with green leaves.
Place the leaves:
- Between flowers
- Behind flowers
- Along the edges
- Around the vase
- Below the bouquet
The leaves help connect the separate flowers into one cohesive composition.
Step 19: Create Flowers Spilling Down the Side
One of the charming details in the inspiration quilt is the group of flowers extending downward from the bouquet.
You can recreate this effect by creating a loose trail of flowers and leaves.
Allow several flowers to move away from the main bouquet.
This makes the design look more organic and gives the impression of flowers cascading from the arrangement.
Step 20: Secure the Appliqué Pieces
Once you’re happy with the composition, attach everything.
Depending on your preferred technique, use:
- Straight stitch
- Zigzag stitch
- Blanket stitch
- Satin stitch
- Hand appliqué
A narrow zigzag or blanket stitch is particularly effective around flower petals.
Step 21: Add Decorative Embroidery
You can add small embroidered details throughout the bouquet.
Try stitching:
- Flower centers
- Leaf veins
- Petal lines
- Small stems
- Decorative swirls
These details make the quilt feel more like a piece of textile artwork.
Step 22: Add the Stems
Use green embroidery thread to create stems connecting the flowers to the vase.
A stem stitch works particularly well.
You can make the stems:
- Straight
- Curved
- Branching
Don’t worry about making every stem visible.
Some can disappear behind the flowers.
Step 23: Arrange the Final Details
Step back from the quilt and look at the whole composition.
Check whether you need:
- More flowers
- More leaves
- More empty space
- Additional color
- More dark or light areas
This is the best time to make changes.
Because the flowers have not yet been permanently sewn, you can easily move them around.
Step 24: Prepare the Quilt Sandwich
Once the quilt top is complete, prepare the three layers:
- Finished quilt top
- Batting
- Backing fabric
Lay the backing flat with the wrong side facing upward.
Place the batting over it.
Then place the quilt top on top.
Smooth all three layers.
Step 25: Baste the Quilt
Secure the layers using:
- Safety pins
- Quilting clips
- Basting spray
- Hand-basting stitches
Start in the center and work toward the edges.
Make sure the layers remain smooth.
Step 26: Quilt the Background
The inspiration quilt features dense decorative quilting throughout the neutral background.
You can create a similar texture using:
- Swirls
- Leaves
- Flowers
- Curved lines
- Meandering stitches
- Free-motion loops
The quilting doesn’t have to be identical throughout the quilt.
Different areas can have slightly different motifs.
Step 27: Echo Quilt Around the Flowers
To make the flowers stand out, quilt around their shapes.
This is called echo quilting.
Follow the contours of the flower petals and leaves.
Leave the actual flowers less densely quilted.
This creates contrast between the raised appliqué and the quilted background.
Step 28: Add Texture to the Vase
Quilt the vase using curved or horizontal lines.
You can follow the shape of the vase.
For example, use:
- Curved horizontal lines
- Small waves
- Diamond quilting
- Free-motion swirls
This makes the vase feel more dimensional.
Step 29: Add a Decorative Border
The inspiration quilt has a wide neutral border surrounding the bouquet.
You can create a simple border using the same fabric as the background.
Alternatively, use a coordinating color.
For a more traditional appearance, add a narrow inner border before the wider outer border.
Step 30: Finish the Edges
After quilting, trim the quilt to create clean edges.
Use a rotary cutter and ruler whenever possible.
Then attach your binding.
You can choose:
- Cream binding
- Green binding
- Blue binding
- A floral print
- A contrasting multicolor binding
A neutral binding allows the colorful bouquet to remain the focal point.
Step 31: Add a Hanging Sleeve
If you’re making this as a wall quilt, sew a fabric sleeve onto the back.
The sleeve can accommodate a wooden dowel or quilt hanger.
This makes it easy to display your finished floral quilt as wall art.
Tips for Making the Flowers Look Three-Dimensional
If you want your flowers to have more dimension, experiment with layered fabrics.
You can:
- Add batting behind selected flowers.
- Use folded fabric petals.
- Layer smaller flowers over larger flowers.
- Add embroidery around the petals.
- Use textured fabrics for some flowers.
Don’t make every flower three-dimensional.
Using the technique selectively creates a more sophisticated effect.
Scrap Fabric Ideas
This project is ideal for using leftover scraps.
Small pieces can become:
- Flower petals
- Centers
- Leaves
- Vase sections
- Tiny decorative flowers
You can even use scraps from old quilts to create a memory flower quilt.
Each flower can represent a previous project or a special piece of fabric.
Easy Variations
Flower Basket Quilt
Replace the vase with a woven basket.
Wildflower Quilt
Use smaller flowers scattered across the background.
Sunflower Quilt
Create a bouquet dominated by yellow sunflowers.
Cottage Garden Quilt
Add butterflies, bees, leaves, and tiny flowers.
Floral Vase Wall Hanging
Make a smaller version designed specifically as wall art.
Final Thoughts
This DIY flower bouquet quilt is a beautiful way to combine colorful fabric scraps with traditional quilting techniques. The combination of hexagon flowers, appliqué, embroidered details, green leaves, and a blue patchwork vase creates a design that looks more like a piece of textile artwork than a traditional quilt.
The project can be as simple or as detailed as you want. Beginners can use larger flower pieces and fusible appliqué, while experienced quilters can experiment with tiny hexagons, English paper piecing, embroidery, and intricate free-motion quilting.
Most importantly, don’t be afraid to mix fabrics.
Different shades, patterns, and textures are what give a handmade flower quilt its personality.
Whether displayed on a wall, used as a decorative quilt, or given as a handmade gift, this colorful floral design is sure to become a beautiful statement piece.