
Christmas Tree Fabric Ornament
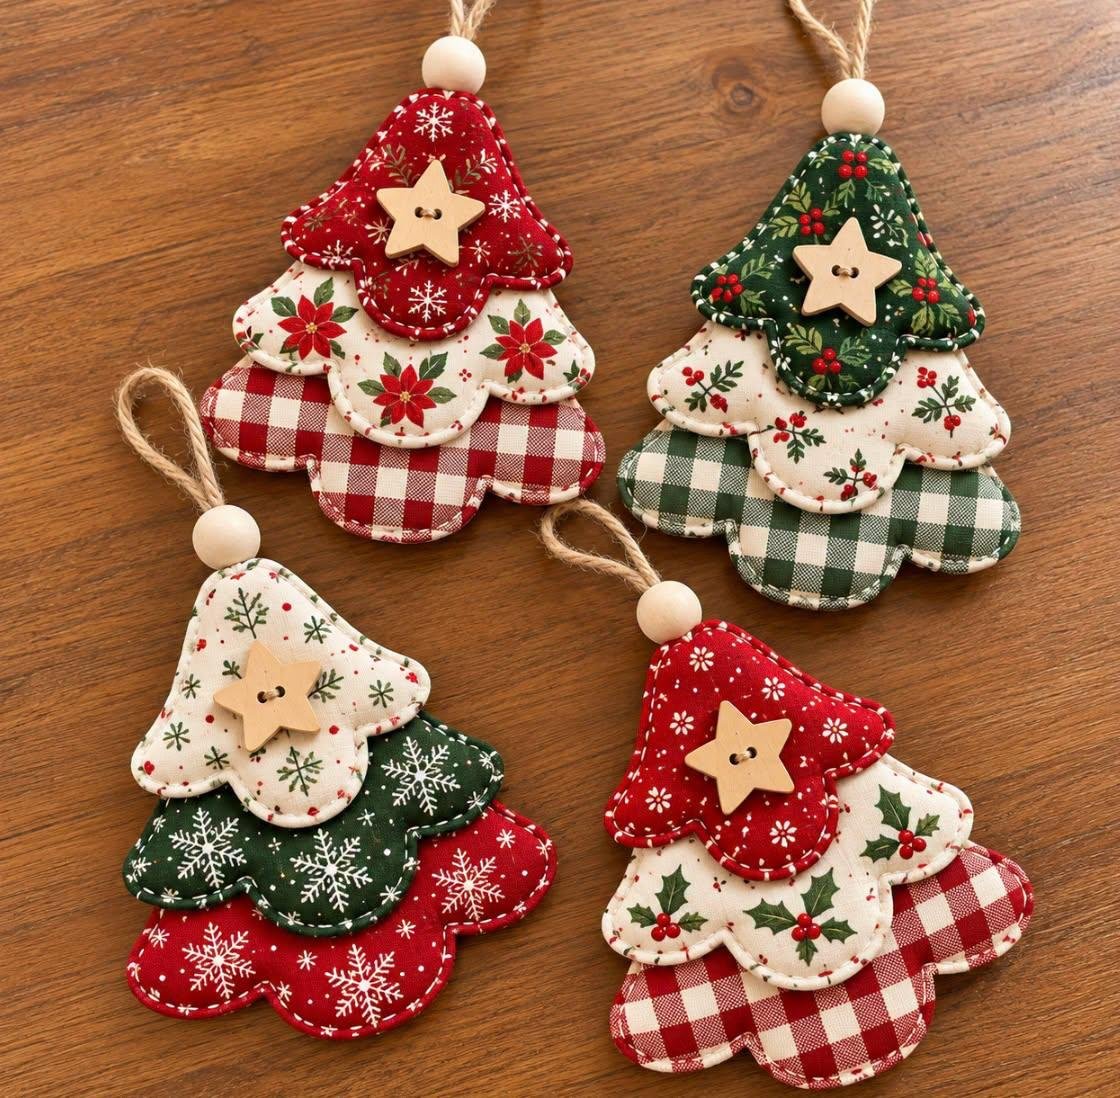
A layered fabric Christmas tree ornament with scalloped edges, decorative topstitching, a wooden star button, a wooden bead, and a rustic twine hanger.


This tutorial recreates the ornaments in your photo using three overlapping fabric tree layers. Each layer has rounded scalloped branches, giving the ornament a soft, dimensional look.
Materials and supplies
-
Christmas cotton fabrics in red, green, cream, and plaid prints
-
Lightweight fusible fleece or thin batting
-
Matching or contrasting sewing thread
-
Wooden star buttons
-
Wooden beads, approximately ¾ inch (2 cm) in diameter
-
Jute twine or rustic cord
-
Paper, pencil, and scissors
-
Sewing machine, pins or clips, iron, and fabric marker
-
Hand-sewing needle
Step 1: Make the Christmas tree template

-
Draw a small Christmas tree approximately 6 inches (15 cm) tall and 5 inches (12.5 cm) wide.
-
Shape the tree with three tiers of rounded, scalloped branches.
-
Add a small rounded tip at the top and a slightly narrower section between each tier.
-
Cut out the paper template.
-
Check that the tree has a balanced silhouette and smooth curves.
For the layered design in your photo, prepare three separate templates:
-
Large tree: 6 × 5 inches (15 × 12.5 cm)
-
Medium tree: 4½ × 3¾ inches (11.5 × 9.5 cm)
-
Small tree: 3 × 2½ inches (7.5 × 6.5 cm)
These are suggested measurements, not the exact dimensions of the original pattern.
Step 2: Cut the fabric pieces

-
Choose three contrasting Christmas fabrics for each ornament.
-
Fold each fabric in half if your template is symmetrical.
-
Trace and cut one large tree, one medium tree, and one small tree.
-
Cut matching pieces from lightweight fusible fleece or thin batting for added body.
-
Fuse or baste the fleece to the wrong side of the fabric, following the manufacturer’s instructions.
You can use a different fabric for the front and back of each layer if you want a reversible ornament.
Step 3: Prepare and quilt each layer
-
Sandwich the fabric and fleece together, if you have not already fused them.
-
Pin the layers to prevent shifting.
-
Sew around the scalloped perimeter, approximately ⅛ inch (3 mm) from the edge.
-
Optionally, add a second line of decorative stitching just inside the first.
-
Trim any loose threads and smooth the curves.
The visible stitching around each layer creates the neat outline seen in the reference photo.
Step 4: Layer the three Christmas trees

-
Place the large tree at the bottom.
-
Position the medium tree on top, moving it upward so the bottom scallops of the large tree remain visible.
-
Place the small tree at the top, overlapping the medium tree in the same way.
-
Adjust the spacing until all three layers form a balanced Christmas tree silhouette.
-
Pin or clip the layers together.
-
Sew a short line through the overlapping center area to secure the layers without flattening all the scalloped edges.
Fabric combination ideas:
-
Red snowflakes + cream poinsettias + red gingham
-
Green holly + cream berries + green gingham
-
Cream snowflakes + dark green snowflakes + red snowflakes
Mixing prints makes each ornament unique.
Step 5: Attach the wooden star

-
Choose a small wooden star button approximately 1½ inches (4 cm) wide.
-
Position it in the center of the top fabric layer.
-
Use a hand-sewing needle and strong thread to sew through the buttonholes.
-
Secure the thread on the back of the small tree layer.
If your star is a flat wooden embellishment without holes, attach it with fabric-safe glue suitable for the materials, allowing it to dry completely.
Step 6: Make the hanging loop
-
Cut a piece of jute twine approximately 8 inches (20 cm) long.
-
Fold it in half to create a loop.
-
Tie the loose ends in a secure knot.
-
Position the knotted ends behind the tip of the large tree, or at the top of the ornament where all three layers meet.
-
Stitch the loop firmly to the back of the ornament.
Leave enough loop length for hanging on a Christmas tree, wreath, or decorative hook.
Step 7: Add the wooden bead

-
Thread the folded loop through a wooden bead with a hole large enough for the twine.
-
Slide the bead down until it rests just above the tree tip.
-
Secure the bead in place with a small knot if needed.
-
Check that the loop hangs straight and the bead cannot slide off.
Depending on the bead’s hole size, it may be easier to thread the twine through before attaching the loop to the fabric.
Step 8: Finish and decorate
-
Check all seams and reinforce the hanger.
-
Trim any visible threads.
-
Press gently with a low-temperature iron, avoiding direct heat on the wooden button and bead.
-
Shape the scalloped edges with your fingers.
-
Repeat with different fabric combinations to create a matching set.

Tips for a professional finish
-
Use lightweight fleece rather than thick batting so the layers remain flexible.
-
Choose fabrics with contrasting colors to make the scalloped edges stand out.
-
Stitch slowly around the curves and pivot frequently for smoother outlines.
-
Secure the hanging loop with several stitches because it will carry the ornament’s weight.
-
Keep the wooden star and bead securely attached, especially if the ornaments will be accessible to small children or pets.
Finished result: a soft, rustic Christmas tree ornament with three overlapping fabric tiers, decorative stitching, a wooden star, and a natural twine hanger — ideal for Christmas trees, handmade gifts, or seasonal craft fairs.