
Scrappy Square & Triangle Patchwork Quilt Tutorial
1. Scrappy Square & Triangle Patchwork Quilt Tutorial
2. Introduction
If you love colorful quilts with a charming handmade appearance, this Scrappy Square & Triangle Patchwork Quilt is a wonderful project to add to your quilting collection!
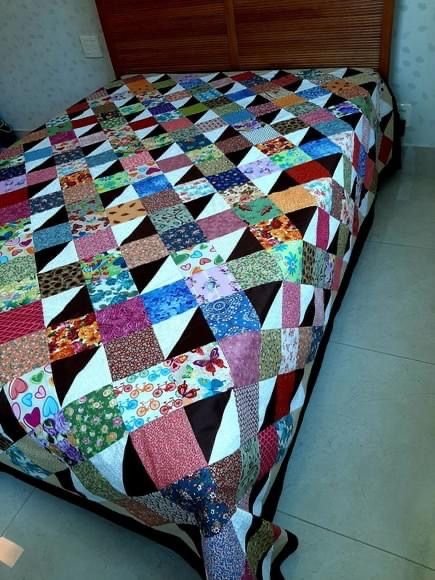
This beautiful design combines an assortment of colorful cotton fabric squares with contrasting half-square triangle blocks. The result is a lively patchwork arrangement filled with movement, geometric shapes, and interesting fabric combinations.
One of the most appealing features of this quilt is its combination of prints. Floral fabrics, geometric designs, tiny polka dots, colorful motifs, and traditional quilting cottons come together to create a unique design. Deep chocolate-brown triangles provide a striking contrast against the light cream sections, helping each geometric block stand out.
This is also an excellent opportunity to use leftover fabric from previous sewing projects. Instead of purchasing an entirely coordinated fabric collection, you can bring together different prints and colors to create something truly personal.
The finished quilt works beautifully as a bedspread, guest-room accent, cozy throw, or thoughtful DIY handmade gift. Although the arrangement looks intricate, the construction relies on simple squares and half-square triangles.
Let’s explore how to make this colorful scrappy patchwork quilt step by step!
3. Pattern Overview & Skill Level
Pattern Details
- Pattern Name: Scrappy Square & Triangle Patchwork Quilt
- Project Type: Traditional patchwork quilting
- Construction: Alternating fabric squares and half-square triangle blocks
- Skill Level: Confident Beginner
- Finished Size: Approximately 64 x 80 inches
- Block Size: 8 x 8 inches finished
- Layout: 8 blocks across and 10 blocks down
- Total Blocks: 80
- Estimated Completion Time: 18–28 hours, depending on sewing experience
The design uses two different block styles:
- Scrappy square blocks made from colorful printed cotton fabrics.
- Half-square triangle blocks combining dark chocolate-brown fabric with light cream fabric.
The blocks alternate across the quilt top to recreate the contrasting geometric appearance seen in the inspiration photograph.
Gauge and Seam Allowance
Unlike crochet, quilting does not use stitch gauge. Accurate cutting and consistent seam allowances are essential.
Use a standard 1/4-inch quilting seam allowance throughout the project.
Each finished block measures 8 inches square. Before joining the blocks, each individual block should measure 8 1/2 inches square, including seam allowances.
4. Materials & Tools Needed
Fabric Requirements
For this version, choose quilting cotton with a mixture of colorful prints and coordinating solid fabrics.
A. Colorful Printed Fabrics
You will need approximately 3 yards of assorted quilting cotton.
Choose a combination of:
- Floral prints in pink, red, blue, and purple.
- Small-scale geometric prints.
- Green botanical patterns.
- Colorful novelty prints.
- Multicolored decorative fabrics.
- Brown, burgundy, and blue patterned cottons.
Fat quarters and leftover fabric pieces are excellent choices.
The inspiration quilt features many different prints rather than a strict color arrangement. Aim for variety instead of matching every fabric perfectly.
B. Dark Brown Fabric
- Approximately 1 1/2 yards of solid chocolate-brown quilting cotton.
This fabric forms one half of the HST blocks and provides the dark geometric shapes throughout the quilt.
C. Light Cream Fabric
- Approximately 1 1/2 yards of ivory or warm white quilting cotton.
Use this fabric to create the contrasting light triangles.
D. Backing Fabric
- Approximately 5 yards of quilting cotton, depending on fabric width and backing construction.
Choose a coordinating print or a solid fabric.
E. Binding Fabric
- Approximately 5/8 yard of fabric for binding.
A dark brown or coordinating multicolored fabric will complement the quilt top.
F. Batting
- One piece approximately 72 x 88 inches.
Cotton batting provides a traditional quilted appearance, while cotton-polyester blends offer a slightly lighter finish.
Additional Sewing Supplies
- Rotary cutter.
- Self-healing cutting mat.
- Acrylic quilting ruler.
- Sewing machine.
- Neutral cotton or polyester sewing thread.
- Fabric scissors.
- Quilting pins or clips.
- Fabric marking pen.
- Iron and ironing board.
- Walking foot (optional).
- Safety pins or quilt basting spray.
- Seam ripper.
5. Quilting Terminology Key
Understanding these common quilting abbreviations will make the instructions easier to follow.
| Term | Meaning |
|---|---|
| HST | Half-square triangle |
| RST | Right sides together |
| WOF | Width of fabric |
| SA | Seam allowance |
| QST | Quarter-square triangle |
| WIP | Work in progress |
| LOF | Length of fabric |
| Binding | Fabric strips used to finish the quilt edges |
| Batting | The insulating middle layer of a quilt |
| Quilt sandwich | The top, batting, and backing layers together |
| Pressing | Using an iron to flatten seams |
| Chain piecing | Sewing multiple pieces continuously without cutting the thread between them |
6. Step-by-Step Instructions: Scrappy Square & Triangle Patchwork Quilt
Project Construction Plan
This version uses 80 blocks arranged in 8 columns and 10 rows.
The layout contains:
- 40 colorful scrappy square blocks.
- 40 half-square triangle blocks.
The alternating arrangement creates the distinctive patchwork appearance of the inspiration photograph.
Phase 1: Prepare and Cut Your Fabric
Begin by washing and pressing your quilting cotton if desired. Prewashing helps remove excess dye and minimizes shrinkage differences between fabrics.
Press everything flat before cutting.
Cut the colorful squares
From your assorted printed fabrics, cut:
- 40 squares measuring 8 1/2 x 8 1/2 inches.
Distribute your fabrics so that similar prints and colors are not placed directly next to one another.
You can use several pieces from the same fabric, but the overall arrangement should feel varied and spontaneous.
Cut the brown and cream fabrics
For the HST blocks, prepare:
- 20 brown squares measuring 9 x 9 inches.
- 20 cream squares measuring 9 x 9 inches.
These 40 pairs will produce 40 half-square triangle units.
Phase 2: Make the Half-Square Triangle Blocks
The half-square triangles are an important feature of this quilt.
Each block combines one dark brown triangle and one light cream triangle.
Step 1: Pair the fabrics
Place one brown 9-inch square on top of one cream 9-inch square.
Position the fabrics with their right sides together (RST).
Align all four edges carefully.
Step 2: Draw the diagonal line
Using a fabric marking pen or pencil, draw a diagonal line from one corner to the opposite corner on the wrong side of the top square.
Step 3: Sew the triangles
Sew a straight line 1/4 inch away from the marked diagonal line.
Turn the fabric and sew another line 1/4 inch from the opposite side of the same diagonal.
You should now have two parallel stitching lines.
Step 4: Cut along the diagonal
Use your rotary cutter to cut directly along the marked diagonal line.
You will now have two triangular units that can be opened to reveal two half-square triangle blocks.
Step 5: Press and trim
Open each unit and press the seam toward the darker brown fabric.
Trim each HST to measure exactly 8 1/2 x 8 1/2 inches.
Repeat the process with all 20 brown and cream fabric pairs.
You should now have 40 HST blocks.
Important: Check the measurements of your first pair before making the remaining blocks. Accurate trimming ensures that the quilt top will assemble evenly.
Phase 3: Arrange the Patchwork Blocks
Now comes one of the most enjoyable parts of the project: arranging the fabrics!
Before sewing anything together, place all 80 blocks on a large flat surface or design wall.
Create an arrangement with alternating colorful squares and HST blocks.
Use this layout:
- Row 1: Square, HST, Square, HST, Square, HST, Square, HST.
- Row 2: HST, Square, HST, Square, HST, Square, HST, Square.
- Row 3: Repeat Row 1.
- Row 4: Repeat Row 2.
- Continue alternating until you have 10 rows.
Rotate the HST blocks to vary the direction of the brown and cream triangles. This helps create the lively geometric appearance of the inspiration quilt.
Color placement tips
- Spread bright red and pink fabrics throughout the quilt.
- Mix blue and green prints between warmer colors.
- Avoid placing identical prints directly beside one another.
- Distribute the dark brown triangles evenly.
- Keep the cream triangles visible to create contrast.
Take a photograph of your layout before moving the blocks to the sewing machine.
Phase 4: Sew the Quilt Rows
Once you are happy with your arrangement, begin joining the blocks.
Step 1: Join the first two blocks
Place two neighboring blocks together with their right sides facing.
Align the edges and pin if necessary.
Sew using a consistent 1/4-inch seam allowance.
Step 2: Continue across the row
Add the next block and continue sewing until all eight blocks are connected.
Press the seams between the blocks consistently.
You can press alternating rows in opposite directions to help the intersections nest together during assembly.
Step 3: Complete all ten rows
Repeat the process until all ten rows are finished.
Each completed row should measure approximately 8 1/2 inches high and 64 1/2 inches wide before joining.
Phase 5: Assemble the Quilt Top
Now join the ten completed rows.
Place Row 1 and Row 2 together with their right sides facing.
Match the seams carefully, especially where the HST blocks meet the colorful squares.
Pin the intersections to prevent shifting.
Sew the rows together using a 1/4-inch seam allowance.
Continue joining the rows until the entire quilt top is assembled.
Press the horizontal seams consistently.
Your finished quilt top should measure approximately 64 1/2 x 80 1/2 inches.
The result should feature a balanced combination of colorful printed squares and alternating brown-and-cream geometric blocks.
Phase 6: Prepare the Quilt Sandwich
The next step is assembling the three layers.
You will need:
- The finished patchwork quilt top.
- The batting.
- The backing fabric.
Place the backing fabric on a large flat surface with the wrong side facing upward.
Smooth out any wrinkles.
Position the batting directly over the backing.
Finally, place the quilt top over the batting with the right side facing upward.
Make sure all three layers are smooth and properly aligned.
Use safety pins or quilt basting spray to secure the layers.
Start from the center and work toward the edges to prevent wrinkles and shifting.
Phase 7: Quilt the Layers Together
For this design, simple quilting lines work beautifully.
You can use straight-line quilting to emphasize the geometric arrangement.
Some attractive options include:
- Stitching in the ditch along the block seams.
- Straight diagonal quilting lines.
- Parallel lines across the colorful squares.
- A combination of vertical and horizontal quilting.
A walking foot is particularly useful because it helps feed all three layers evenly through the sewing machine.
Begin quilting near the center and work outward.
Remove the basting pins as you approach them.
Keep the fabric smooth without pulling or stretching it.
Phase 8: Trim and Prepare the Binding
After quilting, trim away excess batting and backing.
Make sure the quilt edges are straight and all three layers are even.
For a traditional double-fold binding, cut 2 1/2-inch-wide strips from your chosen binding fabric.
Join the strips diagonally to create one continuous length.
Fold the strip in half lengthwise with the wrong sides together and press.
You will need enough binding to cover the entire quilt perimeter, plus additional length for joining the ends.
Phase 9: Attach the Binding
Align the raw edges of the binding with the raw edge of the quilt.
Leave a short tail at the beginning.
Sew the binding around the quilt using a 1/4-inch seam allowance.
At each corner:
- Stop 1/4 inch before reaching the edge.
- Fold the binding upward at a 45-degree angle.
- Fold it back down along the next edge.
- Continue sewing.
When you return to the starting point, join the binding ends neatly.
Fold the binding over the raw edges toward the back of the quilt.
Hand-stitch or machine-stitch the folded edge in place.
Give the finished quilt a gentle press.
Your Scrappy Square & Triangle Patchwork Quilt is now complete!
7. Pro Tips for Success & Customization Ideas
1. Use a Variety of Fabric Prints
The charm of this design comes from its scrappy appearance.
Combine floral, geometric, novelty, and traditional quilting fabrics. Mixing different scales of prints makes the finished quilt more visually interesting.
2. Keep Your HST Blocks Accurate
Half-square triangles can become distorted during sewing and pressing.
Always trim the finished units to the specified 8 1/2-inch measurement before assembling the quilt.
3. Pay Attention to Color Contrast
The inspiration design uses deep brown and light cream triangles.
This contrast is important because it makes the geometric pattern visible even when surrounded by many colorful fabrics.
If you prefer a softer appearance, substitute chocolate brown with navy, charcoal, or dark burgundy.
4. Take Your Time With the Layout
Arrange all your blocks before sewing.
Move similar colors and prints around until the distribution feels balanced.
Taking a photograph of your arrangement is a simple way to preserve your design.
5. Experiment With Quilting Designs
Straight-line quilting is an excellent choice for highlighting the geometric blocks.
However, you can also experiment with diagonal lines, gentle curves, or free-motion quilting for a more decorative finish.
8. Frequently Asked Questions (FAQ)
Can beginners make a Scrappy Square & Triangle Patchwork Quilt?
Yes! This project is suitable for confident beginners who understand basic sewing machine operation and can maintain a consistent 1/4-inch seam allowance. The construction uses simple squares and half-square triangles.
How many fabrics do I need for a scrappy patchwork quilt?
There is no fixed number of prints required. For this version, you need 40 colorful fabric squares, along with solid brown and cream fabric for the HST blocks. Using a wide variety of prints creates a more traditional scrappy appearance.
Can I make this patchwork quilt larger?
Absolutely! Add more blocks to increase the width or length. Each finished block measures 8 inches, so adding one complete column increases the quilt width by approximately 8 inches, while adding one row increases its length by approximately 8 inches.
How do I wash and care for a handmade patchwork quilt?
Wash the quilt on a gentle cycle using cold water and a mild detergent. Avoid harsh bleach and excessive heat. Tumble dry on low or air-dry flat when possible. Always consider the care instructions for your batting and fabrics.
9. Conclusion
This Scrappy Square & Triangle Patchwork Quilt is a beautiful example of how simple geometric shapes and colorful fabrics can come together to create something special.
The combination of multicolored fabric squares, dark brown triangles, and light cream accents gives the design its distinctive handmade charm.
It is also a wonderful way to use leftover quilting cotton and transform small fabric collections into a practical and beautiful home accessory.
Whether you make it as a bedspread, a cozy throw, or a handmade gift for someone special, this quilt offers plenty of opportunities to experiment with color, texture, and fabric placement.
We would love to see your finished creation!
If you make this quilt, share your version and tell us which fabric combinations you chose. Don’t forget to save this tutorial to Pinterest so you can return to it whenever you’re ready for your next quilting project.
Happy quilting!