
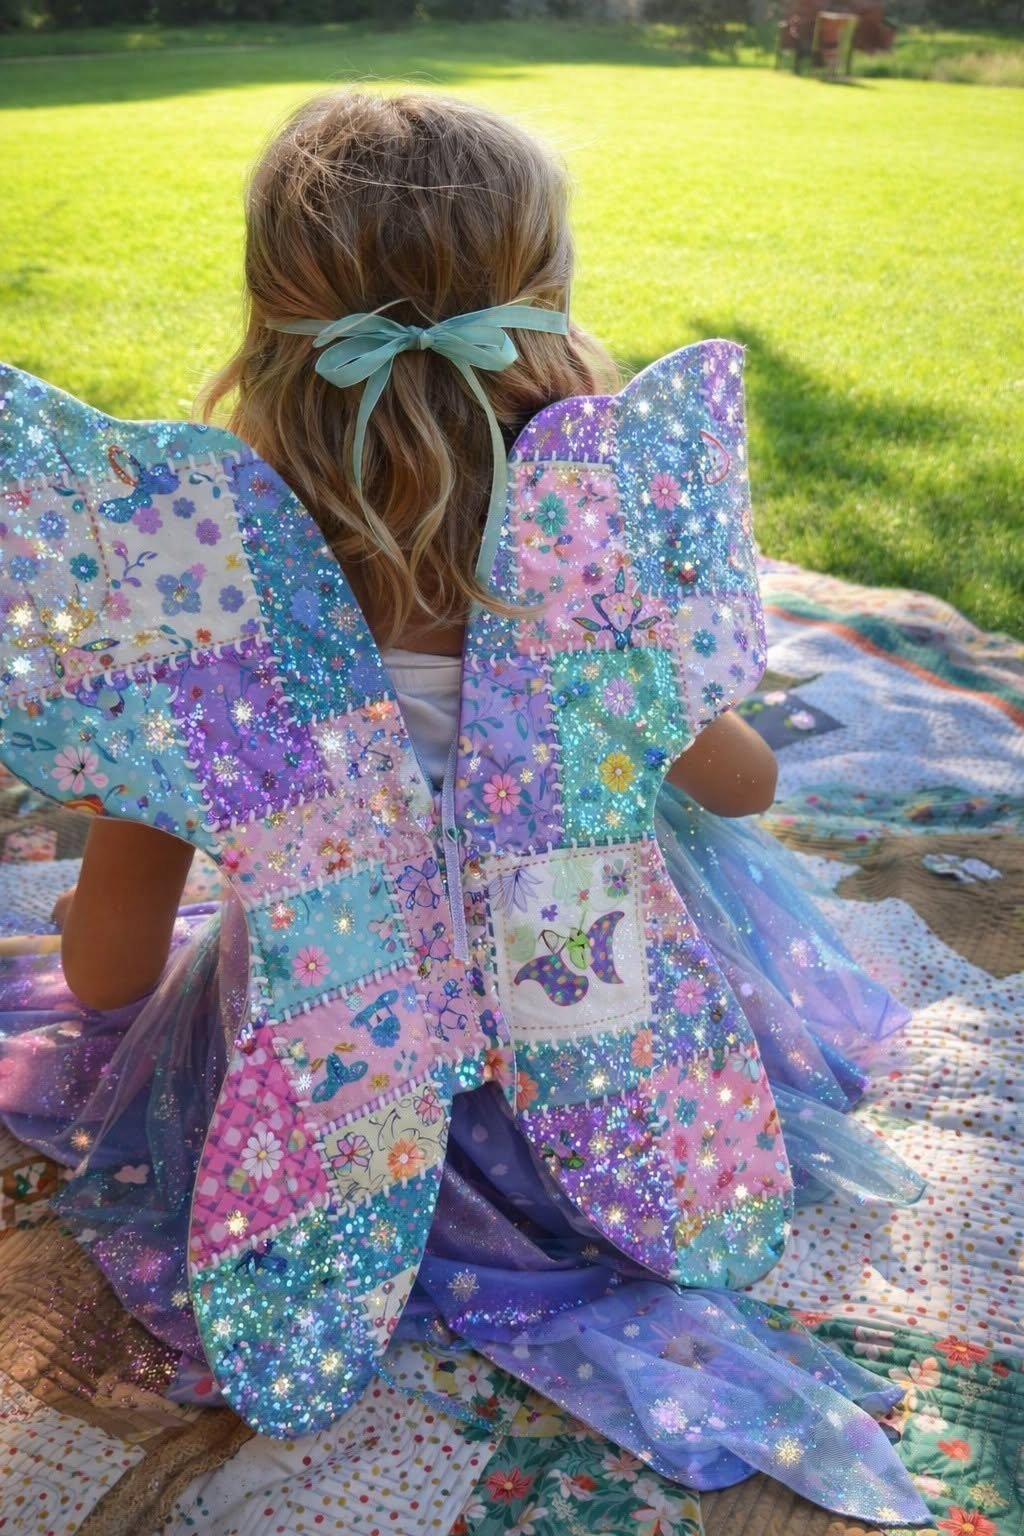
Fairy Patchwork Wings
Materials and supplies
-
Assorted pastel quilting cotton fabrics in pink, lavender, turquoise, blue, and cream
-
Glitter fabric or glitter mesh for a sparkling finish
-
Lightweight fusible interfacing
-
Thin batting or felt for structure
-
Matching backing fabric
-
Sheer purple or blue tulle
-
Matching thread
-
Satin ribbon for the center bow and shoulder straps
-
Fabric scissors or rotary cutter
-
Quilting ruler and cutting mat
-
Sewing machine
-
Pins or sewing clips
-
Fabric marking pen
-
Iron and ironing board
-
Optional: decorative lace, appliqués, and fabric-safe glitter
Step 1: Create the wing pattern
Draw a pair of large fairy wings on kraft paper or pattern paper.
-
Draw a vertical center line to represent the child’s spine.
-
Sketch two symmetrical wings extending outward from the center.
-
Shape the upper edges with rounded curves and the lower edges with long, flowing scallops.
-
Make the wings approximately 45–55 cm (18–22 inches) tall and 35–45 cm (14–18 inches) wide on each side, adjusting the size to suit the child.
-
Add a seam allowance of 1 cm (⅜ inch) around the outer edges.
-
Cut out the paper pattern and check that both wings are symmetrical.
These measurements are suggestions, not exact measurements from the photograph.
Step 2: Cut the patchwork pieces
The wings are made from small fabric patches in different colors and prints.
-
Select fabrics featuring flowers, butterflies, stars, hearts, and other whimsical patterns.
-
Cut squares and rectangles in assorted sizes, such as 6 × 6 cm, 8 × 8 cm, and 8 × 12 cm.
-
Prepare enough pieces to cover both wings.
-
Arrange the pieces on a table before sewing.
-
Alternate light and dark fabrics to create a balanced, colorful patchwork design.
Tip: Combine small prints with larger motifs so the wings look interesting without becoming visually overwhelming.
Step 3: Sew the patchwork panels
-
Arrange the fabric pieces into rows, keeping the colors balanced across both wings.
-
Place two pieces right sides together.
-
Sew along one edge using a ¼-inch (6 mm) seam allowance.
-
Continue joining pieces until you have complete rows.
-
Press the seams flat with an iron.
-
Join the rows together, matching the seams carefully.
-
Repeat the process to create enough patchwork fabric for both wings.
Try to avoid placing identical prints directly beside one another.
Step 4: Add the sparkling finish
To achieve the magical, glittering appearance of the reference, add a lightweight decorative layer.
-
Place the patchwork panel on a flat surface.
-
Layer a lightweight glitter mesh over the front.
-
Pin the layers carefully, smoothing out wrinkles.
-
Baste around the edges to hold the layers together.
-
Add a few lines of decorative stitching if desired.
Choose a soft, flexible glitter mesh rather than a stiff material so the wings remain comfortable to wear. If you use loose glitter, make sure it is securely sealed and suitable for children’s clothing.
Step 5: Cut out the wing shapes
-
Place the completed patchwork panels on top of lightweight batting or felt.
-
Position the paper wing pattern over the fabric.
-
Trace the outline with a fabric marking pen.
-
Cut out the wing shapes carefully.
-
Cut matching shapes from the backing fabric.
-
Repeat for the second wing, checking that the patterns mirror each other.
You can create the wings as two separate pieces or as one continuous pair joined at the center.
Step 6: Assemble the wings
-
Place the front wing fabric and backing fabric right sides together.
-
Position the batting or felt behind the front layer.
-
Pin all the layers around the outer edges.
-
Sew around the perimeter using a 1 cm seam allowance.
-
Leave a small opening along a straight section of the inner edge.
-
Trim excess fabric around the curves, taking care not to cut through the stitches.
-
Turn the wings right side out if the construction allows it.
-
Close the opening with a neat topstitch.
If the wings are too stiff to turn comfortably, finish the edges with bias binding instead.
Step 7: Finish the scalloped edges
The curved edges give the wings their distinctive fairy-like silhouette.
-
Smooth the fabric around every curve.
-
Sew a narrow topstitch around the outer edge.
-
Add decorative blanket stitching or a contrasting zigzag stitch.
-
Use lavender, turquoise, pink, or white thread to complement the patchwork.
-
Check that there are no loose threads or sharp embellishments.
For a more dimensional effect, sew a second decorative line just inside the edge.
Step 8: Add the center bow
-
Cut a length of satin ribbon approximately 60–80 cm (24–31 inches) long.
-
Form two loops and cross them at the center.
-
Pinch the middle tightly.
-
Wrap a short piece of matching ribbon around the center and stitch it securely.
-
Position the bow at the top center of the wings.
-
Hand-sew it firmly in place.
A pale aqua bow works beautifully with the pastel colors in the photograph.
Step 9: Attach the tulle
The flowing tulle gives the costume a soft, ethereal appearance.
-
Cut several lengths of purple, lavender, and pale blue tulle.
-
Make each strip long enough to hang below the wings and trail slightly behind the child.
-
Gather the top edge of each strip with long machine stitches.
-
Pull the bobbin threads gently to create soft gathers.
-
Arrange the gathered tulle along the lower and inner edges of the wings.
-
Secure it with small, reinforced stitches.
-
Trim the ends into soft points or flowing curves.
Keep the tulle lightweight so it does not pull excessively on the wings.
Step 10: Add the straps
-
Cut two lengths of satin ribbon long enough to fit comfortably over the child’s shoulders.
-
Position the ribbons on the back of the wings, one on each side.
-
Reinforce each attachment point with several rows of stitching.
-
If needed, add a small ribbon loop around the center back to help stabilize the wings.
-
Try the wings on over the intended costume and adjust the straps for comfort.
For children’s costumes, avoid tight loops around the neck. Make sure the wings cannot obstruct walking, and supervise children while wearing them.
Step 11: Final decorative details
-
Add small embroidered stars and flowers.
-
Sew on lightweight fabric appliqués.
-
Use contrasting thread to highlight selected patchwork squares.
-
Add a few extra lines of quilting to stabilize larger fabric sections.
-
Check all seams, straps, and embellishments before wearing.
Finishing checklist
Final result: A colorful handmade fairy-wing costume with pastel patchwork, shimmering details, a satin bow, and flowing tulle—perfect for dress-up, a fairy-themed party, or a fantasy photo shoot.
Important pattern note: This is a reconstruction based on the photograph, not an original manufacturer pattern. Exact dimensions, internal construction, and attachment methods may differ from the pictured design.