
Window Quilt
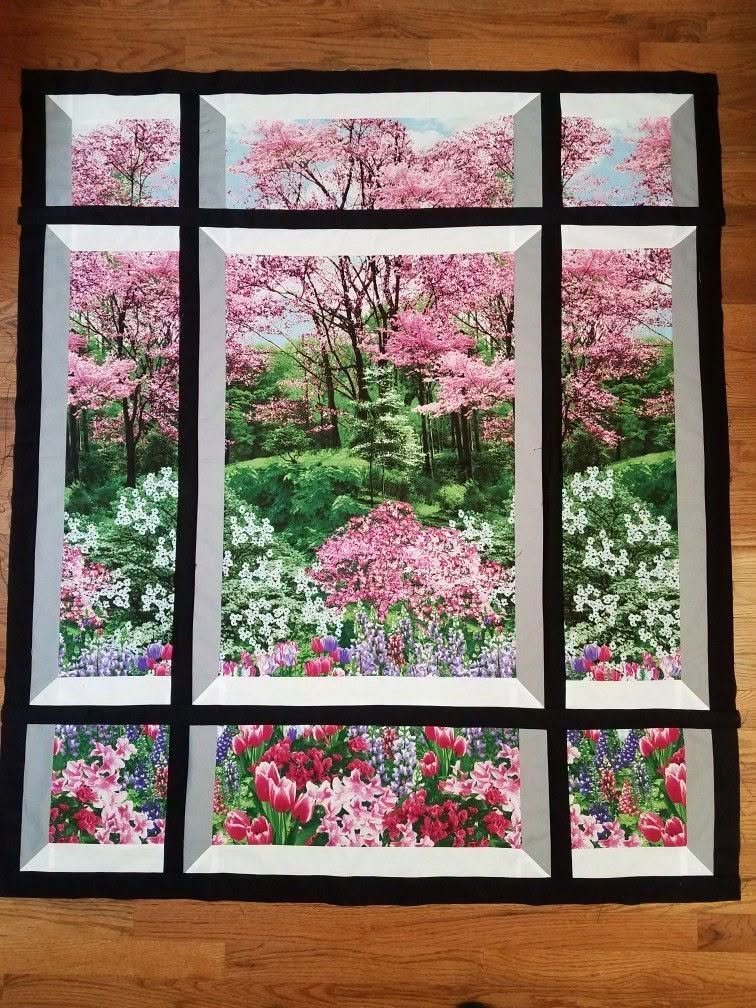
Create a stunning floral picture window quilt using scenic fabric panels, elegant mitered white frames, and bold black sashing. This beautiful design makes the printed fabric look like a collection of framed garden views, with a large central picture surrounded by smaller rectangular windows.
The combination of pink flowering trees, colorful garden flowers, white frames, and black borders creates a striking decorative quilt that looks almost like a series of landscape paintings.
This project is a wonderful way to showcase large-scale floral prints and scenic fabrics.
Materials and Supplies
For this project, you will need:
- Scenic floral or landscape quilting fabric for the window panels
- White or light gray fabric for the window frames
- Black quilting cotton for the sashing and outer border
- Fabric for the backing
- Batting
- Binding fabric
- Rotary cutter and cutting mat
- Quilting ruler
- Sewing machine
- Matching thread
- Pins or sewing clips
- Iron and ironing board
- Fabric scissors
- Measuring tape
Finished Quilt Size
The sample measurements below create a quilt approximately 39 x 42 inches.
You can easily adjust the dimensions to make a larger wall hanging, lap quilt, or bed quilt.
The pattern includes nine framed picture panels arranged in a three-by-three layout.
Step 1: Prepare the Scenic Fabric Panels
Choose a beautiful printed fabric featuring flowers, trees, gardens, or landscapes.
For the best visual effect, use a fabric print with a large continuous design. Try to position the most attractive parts of the print in the center of each panel.
Cut the following picture panels:
| Panel | Quantity | Cutting Size |
|---|---|---|
| Small square panels | 4 | 5½ x 5½ inches |
| Top and bottom center panels | 2 | 13½ x 5½ inches |
| Left and right center panels | 2 | 5½ x 16½ inches |
| Large center panel | 1 | 13½ x 16½ inches |
These measurements include a ¼-inch seam allowance.
Before cutting, check the placement of the printed design. The central panel should showcase the most attractive section of the fabric.
If your fabric has a directional design, keep the flowers and trees oriented consistently.
Step 2: Make the White Picture Frames
The white fabric creates the appearance of elegant window frames around each scenic panel.
Cut white fabric strips 2 inches wide.
You will need enough fabric to frame all nine panels.
The finished visible frame width will be approximately 1½ inches.
How to Sew the Mitered Corners
- Place a scenic fabric panel right side up on your work surface.
- Cut two white strips long enough to extend beyond the top and bottom edges of the panel.
- Position one strip along each side of the picture panel, right sides together.
- Sew using a ¼-inch seam allowance.
- Press the seams toward the white fabric.
- Add the top and bottom white strips, allowing extra fabric to extend beyond each corner.
- Press the seams carefully.
To create the mitered corners:
- Fold the framed panel diagonally at one corner, bringing the two white border strips together with right sides facing.
- Align the outer edges of the strips.
- Mark a 45-degree diagonal stitching line from the inner corner intersection toward the outer edge.
- Sew along the marked line.
- Open the corner and check that the diagonal seam forms a neat 45-degree miter.
- Trim away the excess fabric, leaving a ¼-inch seam allowance.
- Repeat for all four corners.
- Press the finished frame carefully.
Repeat these steps for all nine picture panels.
Tip: Before trimming the corners, unfold and check each miter. This helps prevent mistakes and ensures that the white frames meet neatly.
Step 3: Arrange the Nine Picture Windows
Once all nine framed panels are ready, arrange them into the following layout.
The larger picture panels will form the center of the quilt, while the smaller panels will create the surrounding windows.
| Top Row | ||
|---|---|---|
| Small square | Wide rectangle | Small square |
| Middle Row | ||
|---|---|---|
| Tall rectangle | Large center picture | Tall rectangle |
| Bottom Row | ||
|---|---|---|
| Small square | Wide rectangle | Small square |
Place the panels on a large flat surface before sewing.
Take time to arrange the fabric prints so that the colors flow naturally throughout the quilt.
The large center panel should be the main focal point.
Step 4: Add the Black Sashing
The black fabric creates strong divisions between the picture windows and gives the quilt its distinctive framed appearance.
Cut black fabric strips 2 inches wide.
The finished sashing will measure approximately 1½ inches.
First, sew the three panels in each horizontal row together.
- Place the first and second framed panels right sides together.
- Insert a black sashing strip between them.
- Sew using a ¼-inch seam allowance.
- Press the seams toward the black fabric.
- Repeat to join the third panel.
- Complete all three horizontal rows.
Next, join the rows vertically.
- Cut black sashing strips to the required length.
- Place the first row and second row right sides together with a black strip between them.
- Sew along the edge using a ¼-inch seam allowance.
- Press carefully.
- Attach the third row in the same way.
Make sure the vertical and horizontal black strips line up neatly at the intersections.
The black sashing should create a consistent grid around all nine picture windows.
Step 5: Add the Outer Black Border
To finish the picture window effect, add a black outer border around the entire quilt top.
Cut black fabric strips 2½ inches wide.
Measure the quilt top through the center before cutting the border strips.
- Measure the quilt length through the center.
- Cut two border strips to this measurement.
- Sew one strip to each side of the quilt.
- Press the seams toward the border.
- Measure the quilt width through the center, including the side borders.
- Cut two additional strips to this measurement.
- Sew one strip to the top and one to the bottom.
- Press carefully.
The outer border will have an approximately 2-inch finished width.
Step 6: Prepare the Quilt Sandwich
Now it is time to prepare the quilt for quilting.
You will need three layers:
- Quilt top
- Batting
- Backing fabric
Place the backing fabric on a large flat surface with the wrong side facing up.
Add the batting on top, smoothing out any wrinkles.
Place the quilt top over the batting with the right side facing up.
Make sure all three layers are smooth and properly aligned.
Baste the layers together using safety pins, temporary fabric adhesive, or long basting stitches.
Step 7: Quilt the Layers Together
For this design, simple quilting works beautifully because the printed fabric and framed windows are the main features.
Here are some quilting options:
- Stitch in the ditch along the black sashing.
- Quilt around the white window frames.
- Add gentle straight-line quilting inside the picture panels.
- Use free-motion quilting to add subtle floral or flowing patterns.
For a clean and modern appearance, stitch-in-the-ditch quilting along the black grid is an excellent choice.
Quilt from the center outward to help prevent wrinkles and fabric shifting.
Step 8: Trim and Bind the Quilt
After quilting, trim away excess batting and backing fabric, making sure the quilt edges are straight and even.
Prepare your binding strips.
A common binding strip width is 2½ inches.
- Join the binding strips together with diagonal seams.
- Press the binding strip in half lengthwise, wrong sides together.
- Align the raw edges of the binding with the raw edges of the quilt.
- Sew the binding around the quilt using a ¼-inch seam allowance.
- Fold the binding over to the back.
- Hand-stitch or machine-stitch the binding in place.
- Finish the corners neatly.
Give the finished quilt a final press.
Final Result
Your Floral Picture Window Quilt is now complete!
The scenic fabric panels create the appearance of beautiful garden views framed by elegant white borders. The black sashing adds contrast and structure, making each picture stand out.
This design is perfect for showcasing large-scale floral prints, landscape fabrics, and beautiful garden-themed textiles.
You can also experiment with different fabric combinations to create seasonal quilts, nature-inspired wall hangings, or colorful decorative pieces for your home.
Helpful Tips for a Beautiful Finish
- Choose scenic fabrics with large prints to make the window effect more noticeable.
- Use a consistent white or light-colored fabric for all the frames.
- Press seams carefully throughout the project.
- Check the alignment of the black sashing before sewing the rows together.
- Always measure the quilt top before cutting the outer borders.
- Use a walking foot if your fabric layers tend to shift during quilting.
Enjoy creating your own beautiful picture window quilt!