
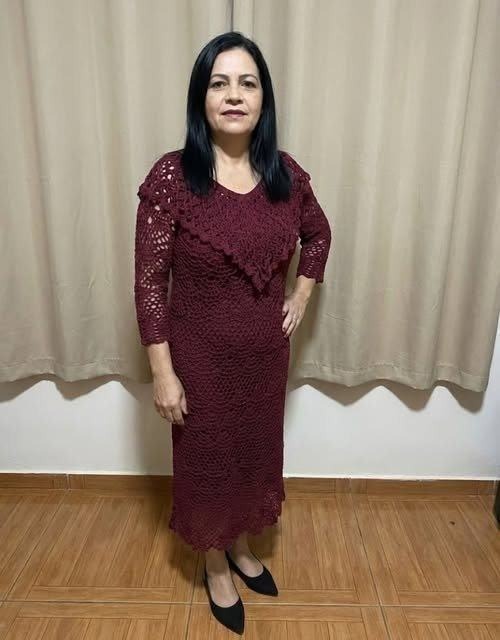
Elegant Burgundy Crochet Dress Pattern
Full Step-by-Step Tutorial for a Handmade Lace Dress
This elegant crochet dress features a feminine fitted silhouette, delicate lace texture, and sophisticated layered neckline detail. The design is ideal for formal events, evening occasions, church wear, weddings, or boutique handmade collections.
The dress is crocheted from the top down using lace and shell stitch combinations that create a slimming and graceful effect.
Pattern Information
Skill Level
Intermediate to Advanced
Construction Style
- Worked mostly in the round
- Top-down construction
- Minimal seaming
- Decorative overlay attached separately
Finished Measurements
| Size | Bust | Waist | Hips |
|---|---|---|---|
| S | 34–36 in | 26–28 in | 36–38 in |
| M | 38–40 in | 30–32 in | 40–42 in |
| L | 42–44 in | 34–36 in | 44–46 in |
| XL | 46–48 in | 38–40 in | 48–50 in |
Length may be customized.
Materials
Yarn
- 1200–1800 g mercerized cotton yarn
- Weight: Fine / Sport / DK
Mercerized cotton gives:
- elegant drape
- stitch definition
- slight shine
- durability
Hook
- 2.5 mm to 3.5 mm crochet hook
Use a smaller hook for:
- firmer structure
- better body shaping
Additional Supplies
- Stitch markers
- Scissors
- Yarn needle
- Measuring tape
- Dress lining fabric
- Invisible zipper (optional)
Gauge
10 cm x 10 cm =
24 dc stitches × 12 rows
Always make a swatch before beginning.
Recommended Colors
Although shown in burgundy, this pattern also looks beautiful in:
- Black
- Emerald green
- Navy blue
- Ivory
- Dusty rose
- Chocolate brown
- Wine red
Stitch Guide (US Terms)
Basic Stitches
Chain (ch)
Yarn over and pull through loop.
Slip Stitch (sl st)
Insert hook, yarn over, pull through all loops.
Single Crochet (sc)
Insert hook, yarn over, pull up loop, yarn over, pull through both loops.
Double Crochet (dc)
Yarn over, insert hook, pull up loop, yarn over, pull through 2, yarn over, pull through 2.
Main Lace Stitch Pattern
The dress texture is created using shells and mesh spaces.
Shell Pattern Repeat
Work:
- 5 dc into next ch-space
- skip next space
- sc into next space
- skip next space
Repeat continuously.
This creates the elegant floral lace texture seen throughout the dress.
PART 1 — Upper Bodice
Foundation Chain
Create a foundation chain that fits comfortably around the fullest part of the bust.
Suggested Starting Chains
| Size | Chains |
|---|---|
| S | 160 |
| M | 176 |
| L | 192 |
| XL | 208 |
Join with sl st to form a ring.
Be careful not to twist the chain.
Round 1
- ch 3
- dc in each chain around
- join with sl st
Round 2
- ch 3
- dc in next st, ch 1, skip next st
- repeat around
This creates the mesh base for the lace design.
Round 3
Begin shell stitch pattern.
Work shells into every ch-1 space around.
PART 2 — Bust Shaping
To create a flattering feminine fit:
Increase Method
Add:
- 1 extra dc inside selected shells
- every 4th or 5th shell
This creates gentle shaping around the bust area.
Continue for approximately:
- 8–10 inches
PART 3 — Decorative Front Overlay
Creating the Overlay Panel
Row 1
- ch 40
- dc across
Row 2
- ch 3
- shell stitch across
Row 3
Increase at beginning and end:
- 2 dc in first stitch
- 2 dc in last stitch
Continue increasing every other row.
Shape
The panel forms a soft triangle or shawl effect that drapes elegantly across the shoulders and chest.
Finishing the Overlay
After reaching desired size:
- block the piece
- sew invisibly onto dress front
- align center point at bust
PART 4 — Waist Shaping
This section creates the fitted hourglass silhouette.
Decrease Rounds
Every 4th round:
- decrease 2–4 stitches evenly
Continue until waist measurement is reached.
Tips for Better Shaping
Place stitch markers at:
- center front
- center back
- side seams
This helps maintain symmetry.
PART 5 — Hip Increases
After waist shaping:
Increase gradually every 5th round:
- add 2–4 stitches evenly
This prevents tightness around hips and improves drape.
PART 6 — Skirt Length
Continue lace pattern until desired length.
Suggested Lengths
| Style | Length |
|---|---|
| Midi | Below knee |
| Maxi | Ankle |
| Formal gown | Floor length |
The sample shown is ankle length.
Optional Flare
For a softer flowing skirt:
Every 6 rounds:
- add 4–6 stitches evenly
This creates elegant movement while walking.
PART 7 — Sleeves
Attaching Sleeves
Attach yarn to armhole.
Work evenly around opening.
Sleeve Pattern
Use same lace repeat as body.
Sleeve Length Options
- Short sleeves
- Elbow sleeves
- 3/4 sleeves
- Full-length sleeves
The original design uses elegant 3/4 sleeves.
Sleeve Tapering
Every 5 rounds:
- decrease 1 shell repeat
This creates a refined fitted sleeve.
PART 8 — Neckline Finishing
Work:
- 1 round sc
- 1 round picot edging
Picot Edge
- ch 3
- sl st into first chain
- skip 1 stitch
- repeat
Creates delicate decorative edging.
PART 9 — Hem Border
Option 1 — Scallop Border
- 7 dc in one stitch
- skip 2 stitches
- sc in next stitch
Repeat.
Option 2 — Floral Edge
Use layered shell motifs for a luxurious finish.
Blocking Instructions
Blocking is essential for professional results.
Wet Blocking Method
- Soak dress in cool water
- Remove excess water gently
- Lay flat on towels
- Shape carefully
- Pin edges if necessary
- Allow to dry completely
Lining Instructions
Because the lace pattern is openwork, lining is highly recommended.
Best Fabric Choices
- Stretch satin
- Jersey lining
- Soft knit slip
- Lightweight crepe
Zipper Option
For a tighter elegant fit:
Add an invisible zipper at:
- center back
or - side seam
Recommended zipper length:
- 20–24 inches
Professional Finishing Tips
For Boutique Quality Results
- Steam lightly after blocking
- Hide all yarn tails carefully
- Use matching sewing thread
- Maintain even stitch tension
- Use mercerized cotton for definition
Styling Suggestions
This dress pairs beautifully with:
- Pointed heels
- Pearl accessories
- Elegant handbags
- Minimal jewelry
- Formal makeup looks
Care Instructions
- Hand wash only
- Cold water
- Dry flat
- Do not wring
- Steam lightly if needed