
Sunbonnet Sue Quilt
A Comprehensive Step-by-Step Tutorial
What Is a Sunbonnet Sue Quilt?
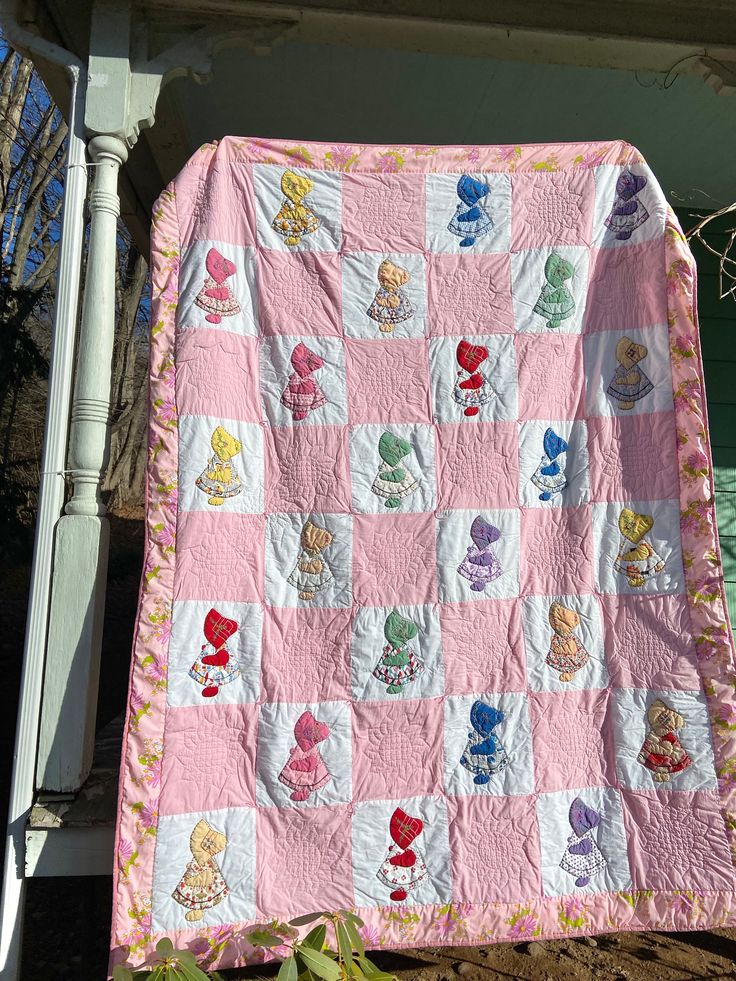
The Sunbonnet Sue Quilt is one of the most beloved and recognizable appliqué quilt patterns in American quilting.
The design features a little girl wearing a large sunbonnet that completely hides her face. The oversized bonnet became the signature characteristic of the pattern.
Sunbonnet Sue first became popular in the early 1900s and reached its greatest popularity during the 1920s through the 1940s. Since then, thousands of variations have been created, making it one of the most iconic appliqué quilt designs in quilting history.
Unlike pieced quilts such as the Log Cabin or Nine Patch, a Sunbonnet Sue quilt is primarily an appliqué quilt, meaning fabric shapes are sewn onto a background fabric rather than pieced together edge-to-edge.
Quilting Vocabulary
| Term | Definition |
|---|---|
| Appliqué | Sewing one piece of fabric onto another to create a design. |
| Raw Edge Appliqué | Appliqué where fabric edges remain exposed and are secured with stitching. |
| Needle-Turn Appliqué | A hand appliqué technique where seam allowances are turned under while sewing. |
| Fusible Web | A heat-activated adhesive used to temporarily bond appliqué pieces to the background fabric. |
| Background Fabric | The fabric onto which the appliqué is attached. |
| Template | A reusable pattern used for cutting fabric shapes. |
| Motif | An individual decorative design, such as one Sunbonnet Sue figure. |
| Blanket Stitch | A decorative stitch commonly used around appliqué edges. |
| Satin Stitch | A dense zigzag stitch used to completely cover raw fabric edges. |
| Freezer Paper | Heavy paper commonly used to make reusable appliqué templates. |
| Reverse Appliqué | A technique where fabric is cut away to reveal another fabric underneath. |
| Fussy Cutting | Cutting fabric to showcase a specific part of a print. |
Materials
Fabric
You will need:
- Background fabric
- Fabric for the bonnet
- Fabric for the dress
- Fabric for the sleeves
- Fabric for the apron (optional)
- Fabric for the stockings
- Fabric for the shoes
- Fabric for accessories (flowers, baskets, balloons, etc.)
Recommended Fabrics
100% quilting cotton
Popular choices include:
- Moda
- Riley Blake
- Robert Kaufman
- Kona Cotton
- Art Gallery Fabrics
- Andover Fabrics
Other Materials
- Fusible web (optional)
- Lightweight interfacing (optional)
- Batting
- Backing fabric
- Binding fabric
- Matching thread
- Embroidery floss (optional)
Tools
- Sewing machine
- Hand sewing needles
- Rotary cutter
- Fabric scissors
- Small embroidery scissors
- Acrylic ruler
- Cutting mat
- Steam iron
- Ironing board
- Fabric marking pencil
- Fine pins
- Appliqué pins
- Paper scissors
Finished Quilt Size
A common throw-size Sunbonnet Sue quilt measures approximately:
60″ × 72″
Each appliqué block is typically:
12″ × 12″ finished
or
12½” × 12½” unfinished
Components of One Sunbonnet Sue Block
A traditional Sunbonnet Sue figure consists of several separate fabric pieces:
- Bonnet
- Head
- Dress
- Arm
- Hand
- Legs
- Shoes
Many patterns also include:
- Apron
- Basket
- Flower
- Balloon
- Teddy bear
- Umbrella
- Cat
- Puppy
Each block may feature Sue in a different pose or activity.
Preparing the Templates
Print or trace each pattern piece onto template plastic or freezer paper.
Each piece should be labeled with:
- Piece name
- Grain direction
- Number of pieces required
If using freezer paper:
Iron the shiny side onto the wrong side of the fabric.
Cut each piece, leaving approximately ¼” seam allowance if using needle-turn appliqué.
If using fusible appliqué, cut directly on the template line with no seam allowance.
Cutting the Fabric
Carefully cut all appliqué pieces.
Keep all pieces organized in labeled envelopes or trays.
Avoid stretching curved edges.
Preparing the Background Block
Cut one square measuring:
12½” × 12½”
Press thoroughly.
Ensure the fabric is perfectly square before beginning.
Arranging the Design
Lay the appliqué pieces onto the background fabric.
Do not begin sewing immediately.
Move the pieces until the proportions look balanced.
Pay special attention to:
- Bonnet angle
- Dress placement
- Foot position
- Arm position
Leave generous background space around the figure.
Attaching the Pieces
There are three popular appliqué methods.
Method One: Fusible Appliqué (Recommended for Beginners)
Apply fusible web to the wrong side of each appliqué fabric.
Cut each shape.
Remove the paper backing.
Arrange the pieces on the background fabric.
Fuse with a hot iron according to the manufacturer’s instructions.
After all pieces are fused:
Secure the edges with stitching.
Method Two: Needle-Turn Appliqué
Turn the seam allowance under using the tip of the needle.
Hand stitch using nearly invisible stitches.
Continue around every curve.
This traditional method produces an elegant, heirloom-quality finish.
Method Three: Machine Appliqué
Place all pieces onto the background.
Secure with pins or fusible web.
Stitch around each shape using one of the following:
- Blanket stitch
- Satin stitch
- Narrow zigzag stitch
- Straight stitch (for raw-edge appliqué)
This is the fastest method.
Stitching Order
Always stitch from the lowest layer upward.
Typical order:
- Legs
- Shoes
- Dress
- Sleeves
- Arms
- Hands
- Bonnet
- Accessories
Layering creates a realistic appearance.
Making Multiple Blocks
Repeat the process for every block.
Many traditional Sunbonnet Sue quilts feature:
- Sue gardening
- Sue skipping rope
- Sue carrying flowers
- Sue flying a kite
- Sue holding balloons
- Sue baking
- Sue feeding birds
- Sue with a kitten
- Sue reading
- Sue carrying a basket
Using different poses keeps the quilt visually interesting.
Joining the Blocks
Arrange the completed blocks into rows.
Example:
5 blocks across
6 blocks down
Join the blocks using a ¼-inch seam allowance.
Press seams carefully.
Alternate seam directions to reduce bulk.
Adding Borders (Optional)
Borders frame the quilt and increase its finished size.
A simple border can be:
2½” wide
or
4½” wide
Many quilters add two borders:
- An inner border in a solid fabric
- An outer border in a coordinating print
Creating the Quilt Sandwich
Layer the quilt:
Backing (wrong side up)
↓
Batting
↓
Quilt top (right side up)
Smooth each layer carefully.
Basting
Secure the layers using:
- Curved safety pins
- Temporary spray adhesive
- Hand basting stitches
Ensure there are no wrinkles or folds.
Quilting
Popular quilting designs for Sunbonnet Sue include:
- Stitch in the ditch around the blocks
- Echo quilting around each figure
- Meandering (free-motion loops)
- Feather motifs
- Crosshatching
- Gentle curves
- Small floral fillers
- Heart motifs
Avoid overly dense quilting that could compete with the appliqué.
Trimming
After quilting:
Trim the quilt evenly.
Check that all four corners are square.
Making the Binding
Cut strips:
2½ inches wide
Join them using diagonal seams.
Press the seams open.
Fold the strip in half lengthwise with wrong sides together.
Press again.
Attaching the Binding
Sew the binding to the front of the quilt using a ¼-inch seam allowance.
Create neat mitered corners.
Fold the binding to the back.
Finish by hand with a blind stitch or by machine with a narrow topstitch.
Final Pressing
Remove any visible threads.
Give the quilt one final gentle press.
Avoid pressing directly over heavily textured embroidery or decorative stitching.
Caring for a Sunbonnet Sue Quilt
- Wash in cold water on a gentle cycle.
- Use mild detergent.
- Avoid bleach.
- Tumble dry on low heat or air dry flat.
- Store folded loosely in a cool, dry place.
- Keep out of prolonged direct sunlight to minimize fading.
Common Beginner Mistakes
- Placing appliqué pieces before checking the overall composition.
- Stretching curved fabric edges while sewing.
- Forgetting seam allowances when using needle-turn appliqué.
- Using thread that contrasts too strongly with the fabric.
- Pulling stitches too tightly, causing puckering.
- Skipping the pressing step after fusing or stitching.
- Crowding the background with oversized motifs.
- Inconsistent block sizes that make assembly difficult.
Professional Tips
- Trace templates onto durable plastic or freezer paper for repeated use.
- Organize each block’s pieces in separate labeled bags before sewing.
- Audition fabric combinations before cutting to ensure good contrast between the bonnet, dress, and background.
- Use fine appliqué needles (sizes 9–11) for hand stitching to make nearly invisible stitches.
- Match your thread color to the appliqué fabric rather than the background for the least noticeable stitching.
- Press frequently, but avoid sliding the iron across the appliqué to prevent distortion.
- If making a traditional quilt, vary the pose and accessories of each Sunbonnet Sue block to create a storytelling effect across the finished quilt.
- Add a quilt label to the back with your name, the date, and the quilt’s title—this is a cherished tradition in heirloom quilting.
