
Tiered Maxi Dress Sewing Pattern
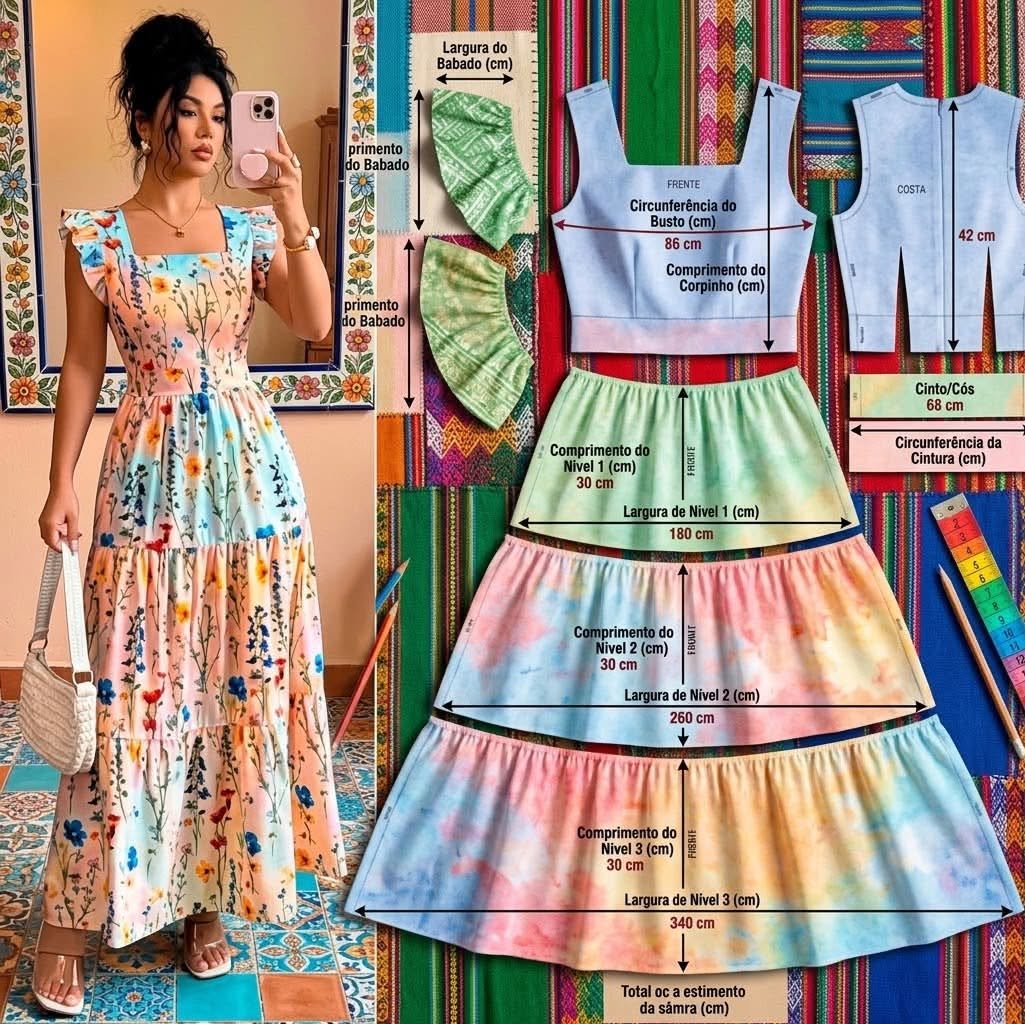
Learn how to make a beautiful DIY tiered maxi dress with this easy sewing tutorial. This feminine summer dress sewing pattern features a fitted bodice, puff sleeves, a gathered waist, and three flowing skirt tiers.
The design is perfect for beginners who want to create a romantic floral maxi dress at home.
Materials
- Lightweight cotton or rayon fabric
- Matching sewing thread
- Sewing machine
- Fabric scissors
- Measuring tape
- Fabric marker or tailor’s chalk
- Pins or sewing clips
- Iron
- Elastic, if needed for the sleeves
- Optional: zipper or buttons for the back closure
Step 1: Take Your Measurements
Before cutting the fabric, take your measurements carefully.
You will need:
- Bust circumference
- Waist circumference
- Shoulder width
- Bodice length
- Dress length
- Arm circumference
- Sleeve length
The measurements in the example image show a 86 cm bust circumference, 68 cm waist circumference, and a 42 cm back length.
Tip: Use your own measurements rather than copying the example measurements if you want the dress to fit properly.
Step 2: Create the Bodice Pattern
The bodice consists of two main pieces:
- Front bodice
- Back bodice
For the front, create a square or slightly curved neckline and fitted waist.
Add the shoulder straps and armholes according to your measurements.
For the back piece, mark the neckline, armholes, waistline, and center-back seam.
Remember to add approximately 1 cm (⅜ inch) seam allowance around the sewing edges.
Step 3: Cut the Bodice
Place your paper pattern on the fabric.
Cut:
- 1 front bodice piece
- 2 back bodice pieces
- 2 sleeve pieces
If you want a fully lined bodice, cut a second set of front and back pieces from your lining fabric.
Step 4: Sew the Bodice
Place the front and back bodice pieces right sides together.
Sew the shoulder seams first.
Then sew the side seams, making sure the bust and waist measurements match.
Press all seams with an iron.
For a cleaner finish, use a zigzag stitch or serger on the raw edges.
Step 5: Make the Sleeves
The example dress has pretty puff sleeves.
Cut two sleeve pieces according to your desired length.
Sew the sleeve seam and gather the top edge slightly.
Attach the sleeves to the armholes of the bodice.
If desired, insert elastic around the sleeve opening to create a soft puffed effect.
Step 6: Prepare the First Skirt Tier
The first skirt tier in the example is approximately:
- 30 cm long
- 180 cm wide
Cut a rectangle according to your desired measurements.
Sew the short ends together to form a large loop.
Then sew a gathering stitch along the top edge.
Pull the threads until the width matches the bottom edge of the bodice.
Step 7: Attach the First Tier
Gather the top edge of the first skirt tier evenly.
Pin it to the bottom of the bodice, right sides together.
Sew around the entire waistline.
Press the seam downward.
You now have the first section of the skirt attached to the bodice.
Step 8: Make the Second Tier
The second tier shown in the example is approximately:
- 30 cm long
- 260 cm wide
Cut a rectangle using your measurements.
Join the short ends together and create a large fabric loop.
Gather the top edge until it matches the bottom edge of the first tier.
Sew the two pieces together and press the seam.
Step 9: Make the Third Tier
The third tier is wider and creates the beautiful flowing shape of the maxi dress.
The example shows approximately:
- 30 cm long
- 340 cm wide
Cut the fabric, join the short ends, and gather the upper edge.
Attach it to the bottom of the second tier.
Distribute the gathers evenly before sewing.
This creates the dramatic three-tiered maxi skirt.
Step 10: Finish the Hem
Fold the bottom edge of the final skirt tier inward.
Press it with an iron.
Sew a straight stitch around the entire hem.
For a delicate finish, you can also use:
- Rolled hem
- Narrow hem
- Bias binding
- Decorative lace
Step 11: Add the Back Closure
Depending on the fit of your bodice, you can add:
- An invisible zipper
- Buttons
- Hook-and-eye closures
An invisible zipper is a good option for a fitted bodice because it gives the dress a clean appearance.
Step 12: Final Pressing
Carefully press the entire dress.
Pay special attention to:
- Shoulder seams
- Waist seam
- Tier seams
- Sleeve seams
- Bottom hem
Trim all loose threads.
Your DIY tiered maxi dress is ready to wear!
✂️ Sewing Tips
- Prewash your fabric before cutting.
- Use lightweight fabrics for a softer, more flowing skirt.
- Always make a test bodice before cutting expensive fabric.
- Distribute gathers evenly between each tier.
- Adjust the tier widths according to your desired amount of volume.
- Add extra length to the final tier if you want a floor-length maxi dress.
How to Customize the Dress
You can easily change this pattern to create different styles:
- 🌸 Floral summer maxi dress
- 🎀 Puff sleeve maxi dress
- 👗 Cottagecore dress
- 🌷 Romantic tiered dress
- ☀️ Lightweight summer dress
- 💐 Boho maxi dress
- 🧵 Beginner-friendly sewing project
- 👚 Midi dress by shortening the tiers