Baby Bonnet Sewing Pattern
Learn how to make a beautiful DIY baby bonnet with this easy sewing tutorial. This vintage-inspired baby bonnet sewing pattern features a gathered back, decorative ruffle, chin ties, and a sweet floral finish. It is perfect for beginners who want to create handmade baby clothes.
Materials
- Cotton fabric
- Matching sewing thread
- Sewing machine
- Fabric scissors
- Measuring tape
- Fabric marker or chalk
- Pins or sewing clips
- Iron
- Ribbon for the chin ties
- Optional: lace or decorative trim
Step 1: Measure the Baby’s Head
Before cutting the fabric, measure the baby’s head.
Measure:
- Head circumference: around the widest part of the head
- Back of the head: from the forehead area to the nape of the neck
- Face opening: from one side of the face to the other
Add a small seam allowance to your measurements.
Tip: Baby bonnets should fit comfortably without being tight around the face or neck.
Step 2: Prepare the Pattern Pieces
A traditional baby bonnet can be made from several simple pieces:
- Main bonnet piece – covers the back and top of the baby’s head.
- Front brim piece – frames the baby’s face.
- Back/gathering piece – creates the gathered fullness at the back.
- Chin ties – secure the bonnet under the baby’s chin.
- Ruffle or lace trim – optional decorative detail.
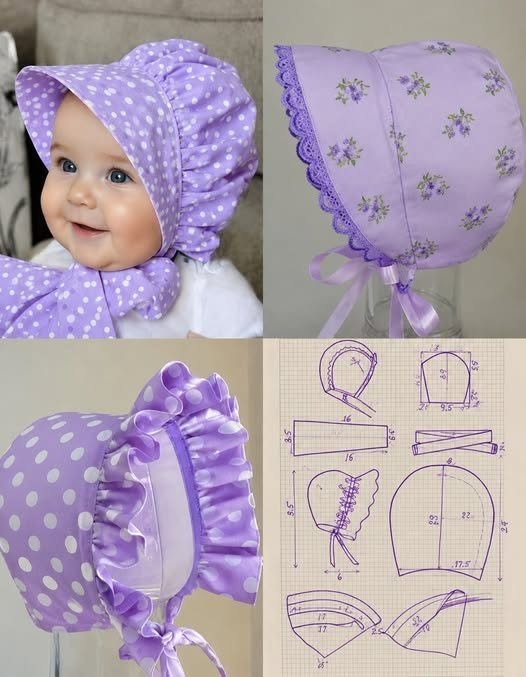
The example shown uses a gathered back and a decorative scalloped trim around the face.
Step 3: Cut the Fabric
Place each pattern piece on the fabric and carefully trace around it.
Cut the pieces, leaving approximately 1 cm (⅜ inch) seam allowance around the edges.
If you are using a lightweight cotton fabric, you can also cut a second set of pieces to make the bonnet lined.
Step 4: Sew the Main Bonnet
Place the main bonnet pieces right sides together.
Pin the curved edges carefully and sew them together using a straight stitch.
Press the seam with an iron.
Take your time around the curves to achieve a smooth, professional finish.
Step 5: Create the Gathered Back
The gathered back is one of the details that gives this bonnet its charming vintage appearance.
Sew two parallel rows of long stitches along the back edge of the bonnet.
Do not backstitch.
Gently pull the bobbin threads to gather the fabric until it matches the width of the corresponding pattern piece.
Distribute the gathers evenly.
Step 6: Make the Front Brim
Fold the front brim piece in half, with the right sides facing each other.
Sew along the curved edge and turn it right side out.
Press it carefully with an iron.
For a more decorative bonnet, add lace, bias binding, or a scalloped trim along the outer edge.
Step 7: Attach the Brim to the Bonnet
Position the brim around the baby’s face opening.
Pin the pieces together carefully, matching the center points.
Sew the brim to the main bonnet.
Press the seam toward the bonnet and topstitch if desired.
Step 8: Add the Decorative Ruffle
For the ruffled version, cut a long strip of fabric.
Finish one long edge and sew a gathering stitch along the other edge.
Pull the threads until the strip is gathered.
Attach the ruffle around the back of the bonnet, distributing the gathers evenly.
This creates the beautiful ruffled baby bonnet effect shown in the example.
Step 9: Add the Chin Ties
Cut two equal lengths of ribbon or fabric ties.
Attach one tie to each side of the bonnet near the face opening.
Sew them securely.
The ties should be long enough to make a small bow underneath the baby’s chin.
Safety note: Never leave a baby unattended while wearing clothing with ties, ribbons, or other loose accessories.
Step 10: Finish the Bonnet
Trim any loose threads and check all seams.
Give the entire bonnet a final press with the iron.
Your handmade baby bonnet is ready!
Sewing Tips
- Use lightweight cotton for a soft and breathable bonnet.
- Wash and iron the fabric before cutting.
- Use a smaller stitch length around curved seams.
- Make sure all inside seams are smooth and comfortable.
- Create a test bonnet from inexpensive fabric before using your final material.
Variations You Can Try
Once you have the basic pattern, you can create many different styles:
- Floral baby bonnet
- Vintage baby bonnet
- Ruffled baby bonnet
- White christening bonnet
- Lace-trimmed baby bonnet
- Reversible baby bonnet
- Newborn bonnet
- Baby bonnet with ribbon ties