
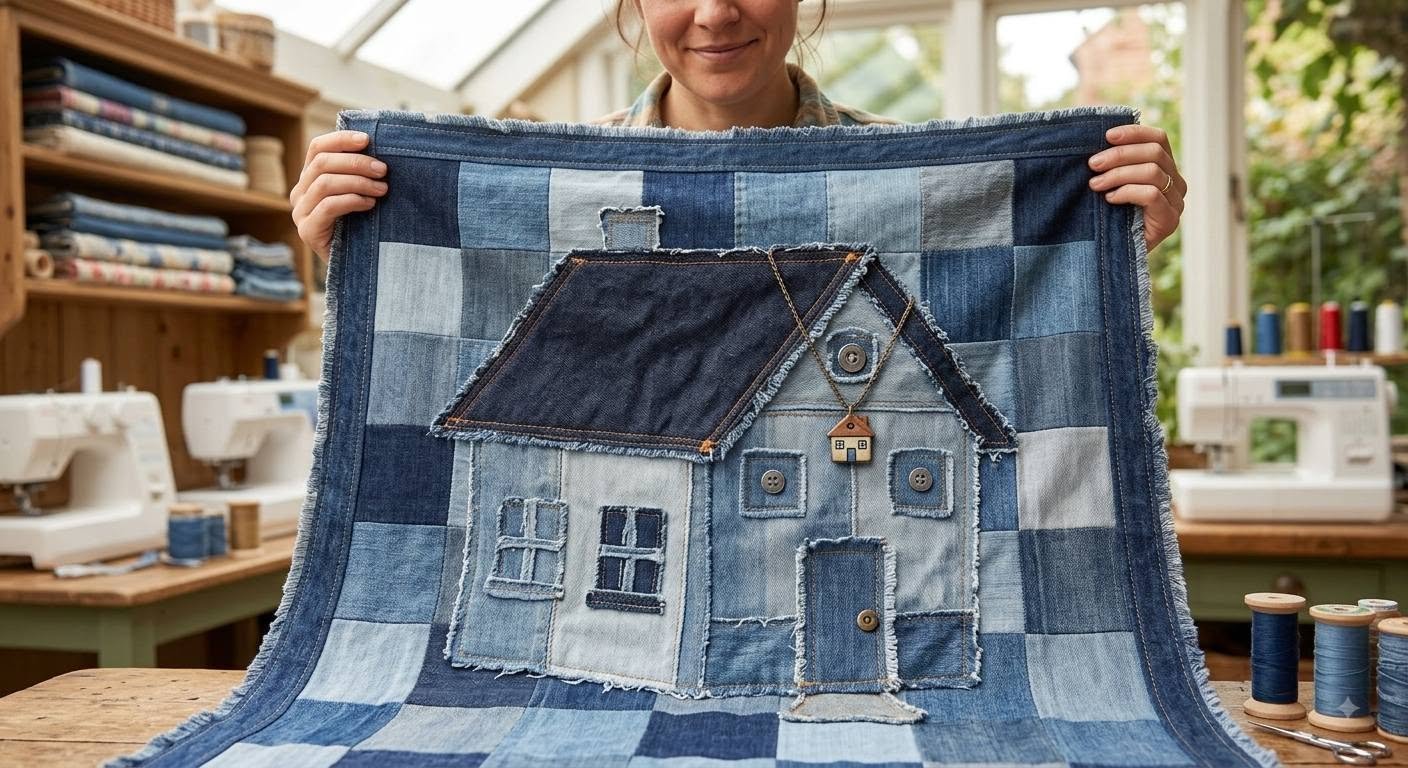
Denim House Quilt
Turn old jeans and denim scraps into a beautiful DIY denim quilt with a charming little house appliqué. This rustic quilt combines denim patchwork, fabric appliqué, raw-edge details, and decorative stitching to create a cozy handmade piece with plenty of character.
This project is perfect for quilters, sewing enthusiasts, and anyone who loves upcycling old clothes into beautiful home décor. You can use different shades of blue denim to create depth and texture, while the house can be customized with windows, doors, buttons, and other small details.
Materials
For this project, you will need:
- Old jeans or denim fabric in different shades of blue
- Cotton fabric for the quilt backing
- Batting or quilt wadding
- Matching or contrasting sewing thread
- Fabric scissors or rotary cutter
- Cutting mat and quilting ruler
- Sewing machine
- Iron and ironing board
- Fabric marker or chalk
- Pins or sewing clips
- Hand-sewing needle
- Buttons for decoration
- Small fabric scraps for the house details
- Optional: embroidery thread
- Optional: fusible interfacing or fusible web
- Optional: decorative ribbon or trim
Tip: Old jeans are perfect for this project because they provide different shades of denim and a beautiful worn-in texture. Wash and dry the jeans before cutting them.
Step 1: Prepare the Denim
Start by collecting old jeans and denim scraps.
Cut away the waistbands, pockets, seams, zippers, and other bulky areas.
Wash and completely dry the denim before beginning the project.
Press the fabric with an iron to remove wrinkles.
Sort the denim into different shades, from very light blue to dark indigo.
Using several shades will make your denim patchwork quilt much more interesting.
Step 2: Decide the Size of Your Quilt
Before cutting the squares, decide how large you want your finished quilt to be.
For example, you could make:
- A small wall hanging
- A lap quilt
- A baby quilt
- A table topper
- A cushion cover
- A larger bed quilt
The project shown in the image works beautifully as a decorative wall quilt, but the same technique can be scaled up.
Step 3: Cut the Denim Squares
Create a simple patchwork background using squares or rectangles of denim.
You can use pieces of different sizes, but keeping the pieces consistent makes the project easier.
For a traditional patchwork effect, cut squares of approximately 10 × 10 cm (4 × 4 inches).
Cut enough pieces to cover the desired quilt area.
Arrange the pieces before sewing.
Try alternating:
- Light denim
- Medium blue denim
- Dark denim
This will create a subtle checkerboard effect.
Step 4: Arrange the Patchwork
Lay all of your denim squares on a large flat surface.
Move the pieces around until you are happy with the arrangement.
Avoid placing too many pieces of the same color next to each other.
For a more natural appearance, mix the different shades randomly.
Take a photograph of your arrangement before moving the pieces.
This will make it much easier to remember where each piece belongs.
Step 5: Sew the Patchwork Rows
Place two squares together with their right sides facing each other.
Sew them together using a straight stitch.
Continue adding squares until you have completed the first row.
Repeat this process for all of the rows.
Press the seams after sewing each row.
You can press the seams open or alternate the direction of the seams between rows to reduce bulk.
Step 6: Join the Rows
Once all the individual rows are finished, place two rows together.
Match the seams carefully.
Pin the rows together and sew them using a straight stitch.
Continue until all the rows are joined.
Press the finished patchwork background.
Because denim can be thick, use a strong sewing needle suitable for heavy fabrics.
A denim or jeans needle is especially helpful for this project.
Creating the Denim House Appliqué
The little house is the focal point of this quilt.
You can make the house from denim scraps in different shades of blue.
Step 7: Create the House Pattern
Draw a simple house shape on paper.
Your pattern can include:
- A rectangular house
- A triangular roof
- Two or more windows
- A front door
- Small decorative details
You don’t need a complicated pattern.
Simple geometric shapes work particularly well with denim.
Cut each part of the house separately.
Step 8: Cut the House Pieces
Use your paper templates to cut the house from denim.
For example:
House body: light or medium blue denim
Roof: dark blue denim
Door: medium or dark denim
Windows: contrasting denim
Chimney: small denim rectangle
You can intentionally leave some edges raw.
The frayed edges give the project a beautiful rustic farmhouse quilt appearance.
Step 9: Add the Roof
Cut two pieces for the roof or one larger triangular piece.
Position the roof over the house body.
Overlap the edges slightly.
Sew around the roof using a straight stitch.
For a rustic look, use a contrasting thread and sew approximately 0.5 cm (¼ inch) from the edge.
You can also sew a second line of stitching for additional texture.
Step 10: Add the Windows
Cut small denim rectangles for the windows.
Place them on the house.
To create the window panes, sew narrow strips of denim or embroidery thread across each window.
You can make:
- Two-pane windows
- Four-pane windows
- Six-pane windows
Don’t worry about making every window identical.
Small variations make the quilt look more handmade.
Step 11: Add the Door
Cut a small rectangle for the front door.
Position it near the bottom of the house.
Sew around the edges.
For a realistic detail, add a small button or metal embellishment as a door handle.
You can also add a tiny fabric step or porch underneath the door.
Step 12: Add the Chimney
Cut a small rectangular piece of denim.
Place it behind the roof so that only the upper section is visible.
Sew it into position.
For additional detail, you can embroider a few lines to imitate bricks.
Adding Decorative Details
Step 13: Use Buttons and Small Embellishments
Buttons are a great way to add dimension to your denim house.
You can use them for:
- Door handles
- Window details
- Flowers
- Decorative elements
- Roof accents
Wooden buttons work particularly well with the rustic blue denim aesthetic.
Make sure decorative pieces are firmly attached, especially if the quilt will be used by children.
Step 14: Add Embroidery
For an even more detailed quilt, use embroidery thread to add tiny decorative elements.
You could stitch:
- Flowers
- Grass
- Trees
- Smoke coming from the chimney
- Window frames
- Roof lines
- Little pathways
- Birds
- Stars
A simple running stitch is enough to create beautiful details.
Assembling the Quilt
Step 15: Position the House on the Background
Place the finished house appliqué in the center of the denim patchwork.
Move it around until you find the position you like.
You can center the house or place it slightly to one side.
Pin or temporarily secure all the pieces.
Step 16: Attach the Appliqué
There are several ways to attach the house.
Machine Appliqué
Use a straight stitch around each piece.
This is the easiest option and creates the visible stitched outline seen in many rustic quilts.
Raw-Edge Appliqué
Leave the edges unfinished and sew around them.
Over time, the denim edges will fray slightly, creating a beautiful vintage effect.
Fusible Appliqué
Apply fusible web to the back of the fabric pieces before positioning them.
Iron them into place and then stitch around the edges.
This is useful if you want the pieces to remain perfectly positioned while sewing.
Step 17: Add the Quilt Layers
Once your entire quilt top is finished, prepare the three layers:
- Denim quilt top
- Batting
- Backing fabric
Place the backing fabric face down.
Add the batting on top.
Place the finished denim quilt top over the batting.
Smooth all three layers carefully.
Step 18: Secure the Layers
Pin or clip the three layers together.
Quilting clips are particularly useful because denim can be quite thick.
Start securing the quilt from the center and work toward the edges.
This helps prevent unwanted wrinkles and shifting.
Step 19: Quilt the Layers
You can quilt the piece using straight lines.
For example, sew along some of the existing patchwork seams.
This creates a simple and attractive denim patchwork quilting pattern.
You can also quilt around the house to make the appliqué stand out.
For a more decorative look, add:
- Horizontal lines
- Vertical lines
- Crosshatching
- Free-motion quilting
- Stitch-in-the-ditch quilting
Keep the quilting relatively simple if you are working with thick layers of denim.
Finishing the Quilt
Step 20: Trim the Edges
After quilting, place the quilt on a flat surface.
Trim the edges so that all three layers are even.
Use a rotary cutter and quilting ruler for the straightest results.
Be careful when cutting through multiple layers of denim.
Step 21: Add the Quilt Binding
Cut strips of cotton or denim for the binding.
Sew the binding around the entire edge of the quilt.
Fold the binding over the raw edges and stitch it securely.
You can use contrasting fabric for the binding or choose a dark denim that blends with the background.
Step 22: Add a Hanging Sleeve
If you are making the quilt as a wall hanging, add a fabric sleeve to the back.
The sleeve allows you to insert a wooden dowel or quilt hanger without damaging the quilt.
This is especially useful for displaying your handmade denim house quilt as home décor.
Optional: Add More Houses
If you want to make the quilt larger or more detailed, create a small neighborhood.
You can add:
🏠 Different houses
🌳 Trees
🌷 Flowers
🚪 Doors
🪟 Windows
☁️ Clouds
🐦 Birds
🌙 A moon
⭐ Stars
Use different denim shades for each element.
This can turn a simple upcycled denim quilt into a complete little village scene.
Tips for Sewing With Denim
Denim is much heavier than regular quilting cotton, so keep these tips in mind.
Use the correct needle
A denim/jeans sewing machine needle is recommended.
Don’t sew through too many layers
Avoid creating extremely bulky seams whenever possible.
Use a longer stitch
A stitch length around 3–3.5 mm often works well for heavier denim.
Press carefully
Use steam and a pressing cloth if necessary.
Test your machine first
Before sewing the actual quilt, test several layers of your denim on a scrap piece.
This will help you find the correct needle, thread, tension, and stitch length.
How to Make This Project More Sustainable
One of the best things about this project is that you can turn old clothing into something completely new.
Instead of throwing away jeans that no longer fit or are damaged, save the usable sections.
Old denim can become:
- Quilts
- Wall hangings
- Bags
- Pillow covers
- Table runners
- Placemats
- Fabric baskets
- Quilted jackets
This makes the project a great example of creative upcycling and sustainable sewing.
Easy Variations
You don’t have to recreate the exact house shown in the inspiration image.
Try different styles such as:
Farmhouse House Quilt
Use neutral fabrics, beige accents, and natural wooden buttons.
Modern Denim Quilt
Use only geometric shapes and several shades of blue.
Cottage Quilt
Add flowers, gardens, tiny windows, and colorful fabric scraps.
Christmas House Quilt
Add snow, Christmas trees, stars, and red fabric accents.
Village Quilt
Create several small houses with different roofs and doors.
Final Thoughts
This DIY denim house quilt is a wonderful way to combine quilting, sewing, appliqué, and fabric upcycling in one project. The beauty of working with recycled denim is that every pair of jeans has its own shade, texture, fading, and history, making every finished quilt completely unique.
You can keep the design simple with only a few houses and basic patchwork, or spend more time adding embroidery, buttons, appliqué, and decorative stitching.
Most importantly, don’t worry about making every piece perfectly identical. The slightly irregular, handmade appearance is part of what makes a rustic denim quilt so charming.