
Chair Seat Cover Sewing Pattern
DIY Chair Seat Cover Sewing Pattern: Step-by-Step Tutorial
Learn how to make a beautiful DIY chair seat cover with this easy step-by-step sewing tutorial. This fitted removable chair cushion cover is designed to wrap around the seat and extend down the sides, creating a neat, tailored look without needing complicated upholstery techniques.
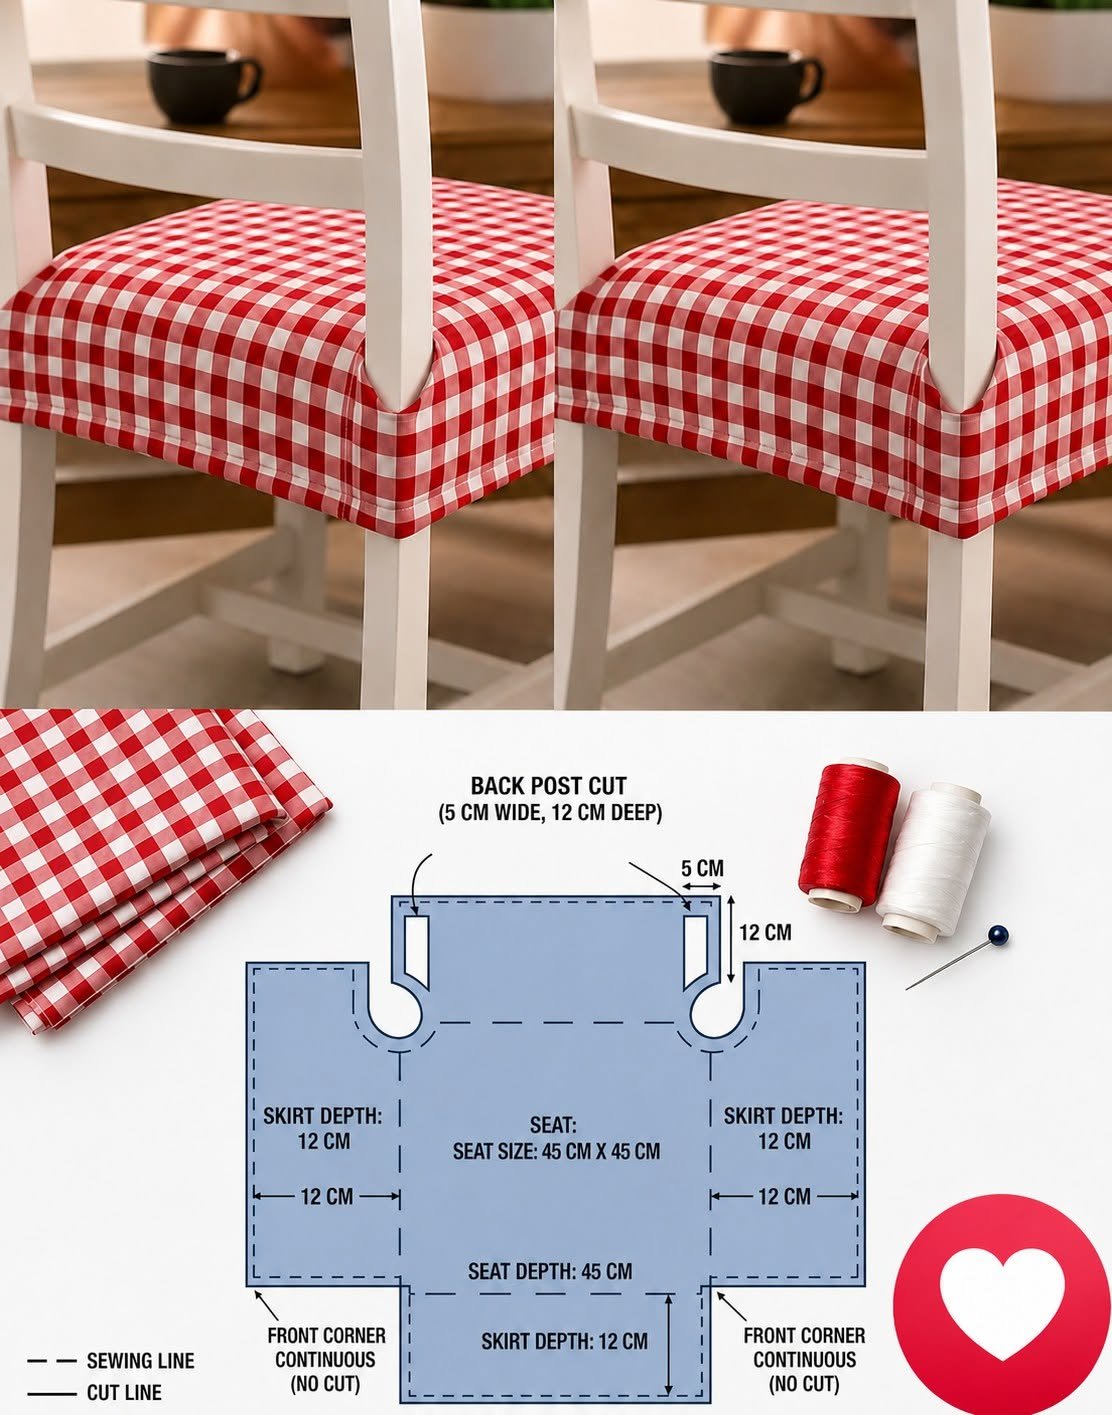
The example uses classic red and white gingham fabric, making it perfect for farmhouse, country, cottage, kitchen, or dining room décor. The pattern is designed for a 45 × 45 cm chair seat with a 12 cm skirt depth around the sides.
This is a great beginner-friendly sewing project if you want to make your own chair covers and give old dining chairs a fresh new look.
Materials
Before starting, gather all the materials you will need.
Fabric
Choose a medium-weight woven fabric such as:
- Cotton
- Cotton canvas
- Linen blend
- Gingham
- Checkered cotton
- Quilting cotton
- Lightweight upholstery fabric
For the look shown in the example, a red and white gingham fabric works beautifully.
Choose a fabric that is durable enough for regular use, especially if the chair will be used every day.
Other Supplies
You will also need:
- Sewing machine
- Matching sewing thread
- Fabric scissors
- Measuring tape
- Quilting ruler or straight ruler
- Fabric marker or tailor’s chalk
- Sewing pins or clips
- Iron and ironing board
- Seam ripper
- Optional: fabric stabilizer
- Optional: matching bias tape
Measurements for the Example Chair Cover
The pattern shown in the image is designed around a 45 × 45 cm square chair seat.
The main measurements are:
- Seat width: 45 cm
- Seat depth: 45 cm
- Skirt depth: 12 cm
- Back post cut: 5 cm wide × 12 cm deep
The side and front skirt sections extend 12 cm downward from the seat.
Important: These measurements are based on the example shown. Before cutting your fabric, measure your own chair because dining chair seats can vary considerably in size and shape.
Step 1: Measure Your Chair
Place the measuring tape across the chair seat.
Measure the:
- Width of the seat
- Depth of the seat
- Thickness of the seat
- Distance between the back posts
- Position of the rear chair legs or posts
The example uses a square 45 × 45 cm seat, but your chair may be slightly different.
If your seat is 40 × 45 cm, for example, adjust the pattern accordingly.
Step 2: Decide the Skirt Length
The skirt is the fabric that hangs down around the edges of the chair seat.
In the example, the skirt is approximately:
12 cm deep.
This creates a neat drop around the front and sides of the chair.
You can make the skirt longer or shorter depending on the style you want.
For example:
- 8–10 cm = short modern skirt
- 12 cm = classic fitted look
- 15–20 cm = deeper decorative skirt
A 12 cm skirt is a good choice for a simple dining chair cover.
Step 3: Create the Main Pattern
The easiest way to understand this chair cover is to think of it as one large piece of fabric shaped around the seat.
The central section represents the chair seat.
The surrounding sections become the skirt.
For the example:
Center seat: 45 × 45 cm
Then add:
12 cm skirt depth to the front and both sides.
The back section requires special shaping around the chair’s back posts.
Step 4: Mark the Seat Area
Place the fabric on a large, flat surface.
Using your measuring tape and fabric marker, mark the central 45 × 45 cm seat area.
This is the section that will sit directly on top of the chair.
Draw the lines carefully.
These lines are useful because they show exactly where the seat ends and where the skirt begins.
Step 5: Add the Side Skirts
From the left and right edges of the 45 cm seat section, measure 12 cm outward.
Mark the lines.
These sections will become the side skirts.
Do the same at the front edge of the seat.
You should now have:
- A 45 × 45 cm central seat
- A 12 cm skirt on the left
- A 12 cm skirt on the right
- A 12 cm skirt at the front
The back requires additional shaping because of the chair’s back posts.
Step 6: Create the Back Post Openings
This is one of the most important parts of the pattern.
If your chair has vertical back posts or legs that extend upward from the seat, the fabric needs to wrap around them.
In the example, the back post opening is approximately:
5 cm wide × 12 cm deep.
Mark these openings carefully.
The openings should align with the position of the chair’s back posts.
Tip: Measure the actual width of your chair posts rather than automatically using 5 cm. The pattern should match your chair.
Step 7: Understand the Cut Lines
The diagram shows two different types of lines:
Solid line = cut line
Dashed line = sewing line
This distinction is extremely important.
The solid line indicates where you should cut the fabric.
The dashed line indicates where the fabric will be folded or sewn.
When transferring the pattern to fabric, make sure you don’t accidentally cut along a sewing line.
Step 8: Keep the Front Corners Continuous
The pattern specifically indicates:
“Front corner continuous – no cut.”
This means you should not cut through the front corners.
Keeping these corners connected allows the fabric to wrap naturally around the front of the chair.
This also reduces the number of seams and gives the finished cover a cleaner appearance.
Instead of cutting the skirt into separate pieces, the fabric remains connected around the corner.
Step 9: Add Seam Allowance
Before cutting the fabric, remember to add a seam allowance where necessary.
A seam allowance of approximately:
1–1.5 cm
is usually suitable for this type of project.
Mark your sewing line first and then add the seam allowance outside it.
Don’t add extra allowance to areas where the pattern specifically indicates the finished edge or where no seam is required.
Step 10: Cut the Fabric
Once the entire pattern has been marked, carefully cut around the outer cutting line.
Take your time around the back post openings.
The goal is to create one main piece that can be folded and sewn into the shape of the chair.
If you are using gingham or another checkered fabric, pay special attention to the direction of the checks.
Keeping the pattern aligned can make the finished cover look much more professional.
Step 11: Mark the Sewing Lines
After cutting, transfer the important sewing lines to the wrong side of the fabric.
The sewing lines will help you identify:
- The edge of the seat
- The skirt folds
- The back post openings
- The corners
- The areas that need to be stitched
This is particularly helpful for beginners.
Step 12: Test the Fabric on the Chair
Before sewing anything permanently, place the fabric over the chair.
Center the 45 × 45 cm seat section on the chair.
Allow the 12 cm skirt sections to fall around the sides.
Check the back post openings.
This is the perfect moment to make adjustments.
If the fabric doesn’t align correctly, remove it and modify the pattern before sewing.
Step 13: Sew the Back Post Areas
Start with the more complicated areas around the back posts.
Fold the fabric along the marked lines.
Pin or clip the fabric into position.
Sew carefully around the shaped openings.
Because this area will experience movement when the cover is placed on and removed from the chair, reinforce the seams.
A second row of stitching can provide additional durability.
Step 14: Sew the Side Skirts
Fold the side skirt sections downward.
Align the edges with the corresponding sections of the seat.
Pin the fabric in place.
Sew along the marked sewing lines.
Repeat on the opposite side.
Try to maintain the same seam allowance on both sides.
This helps the cover remain symmetrical.
Step 15: Sew the Front Skirt
Now work on the front section.
Fold the 12 cm front skirt downward.
Make sure the corners remain connected as shown in the original pattern.
Sew the necessary seams carefully.
Press the fabric after sewing.
A well-pressed seam will make a huge difference in the finished appearance.
Step 16: Finish the Raw Edges
Raw fabric edges can fray, especially after repeated washing.
Choose one of these finishing methods:
Zigzag Stitch
Run a zigzag stitch along the raw edge.
Overlock/Serger
If you own a serger, this provides a clean professional finish.
Bias Binding
For a decorative finish, cover the raw edges with matching or contrasting bias tape.
Double Fold Hem
Fold the fabric inward twice and stitch it down.
For a simple chair cover, a double-fold hem works very well.
Step 17: Create the Bottom Hem
Fold the bottom edge of each 12 cm skirt section inward.
Press the fold with an iron.
Fold it again to hide the raw edge.
Sew around the hem.
Keep the hem width consistent on all sides.
This will create a clean finished edge and help prevent fraying.
Step 18: Press the Finished Cover
Iron the entire cover before putting it on the chair.
Pay particular attention to:
- Corners
- Skirt seams
- Back post openings
- Hem
- Seat edges
Pressing helps the fabric hold its shape.
It also gives handmade sewing projects a much more polished appearance.
Step 19: Try the Cover on the Chair
Place the finished cover over the chair.
Center the seat section carefully.
Check that:
- The seat is completely covered.
- The side skirts hang evenly.
- The front skirt is centered.
- The back post openings line up correctly.
- The fabric isn’t pulling excessively.
- The corners sit neatly.
If the cover is too loose, you can take in the seams slightly.
If it is too tight, you may need to release some of the seam allowance.
Step 20: Optional – Add Ties
If you want the cover to stay firmly in place, you can add fabric ties.
Cut several strips of fabric approximately:
3–4 cm wide
and fold them to create narrow ties.
Attach them underneath the chair where they won’t be visible.
You can use ties at:
- The back corners
- The front corners
- The side sections
This is particularly useful for chairs that are frequently used.
Step 21: Optional – Add a Cushion
For a softer chair, you can place a thin piece of foam or chair cushion underneath the cover.
Measure the seat carefully before purchasing the foam.
The cushion should fit completely underneath the fabric without making the cover too tight.
You can also sew a separate removable cushion insert.
Step 22: Choose the Right Fabric
The red gingham shown in the example creates a classic farmhouse appearance.
However, this pattern can be made with many different fabrics.
Farmhouse Style
Try:
- Red gingham
- Black and white checks
- Cream cotton
- Neutral stripes
Cottage Style
Try:
- Floral cotton
- Small gingham
- Pastel prints
- Vintage-inspired fabric
Modern Style
Try:
- Solid linen
- Minimal geometric prints
- Neutral canvas
- Black and white fabric
Rustic Style
Try:
- Plaid
- Heavy cotton
- Denim
- Natural linen
How to Calculate the Fabric You Need
Before buying fabric, calculate the size of your pattern.
For a 45 × 45 cm seat with a 12 cm skirt, remember that the finished dimensions are larger than the seat itself because the fabric extends down around the edges.
The exact amount of fabric required will depend on:
- Fabric width
- Seam allowance
- Hem allowance
- Back post openings
- Pattern orientation
- Whether you want the checks aligned
For a single chair, it is always better to buy a little extra fabric rather than cutting too closely.
If you’re using a directional print, purchase additional fabric so you can keep the pattern oriented correctly.
Tips for Sewing a Professional-Looking Chair Cover
1. Measure twice
The most common mistake in sewing furniture covers is cutting before checking the measurements.
Measure your chair at least twice.
2. Make a paper or inexpensive fabric test
If your chair has an unusual shape, make a test version using inexpensive fabric first.
This allows you to adjust the pattern without wasting your final fabric.
3. Press every seam
Don’t skip pressing.
Ironing between sewing steps makes the finished project look much more professional.
4. Match the pattern
If you are using gingham, plaid, or stripes, try to align the pattern across the seat and skirt.
5. Reinforce high-stress areas
The back post openings and corners receive more stress.
Use reinforced stitching in these areas.
Common Mistakes to Avoid
Cutting the Back Openings Too Large
The back post openings should be large enough to fit around the chair posts but not so large that they leave unnecessary gaps.
Measure the posts first.
Forgetting Seam Allowance
If you cut exactly to your finished measurements without adding seam allowance, the cover may end up too small.
Cutting the Front Corners
The pattern specifically keeps the front corners continuous.
Cutting through these areas can change the way the skirt hangs.
Ignoring Fabric Direction
With gingham, stripes, or directional prints, always check how the pattern will appear once the cover is assembled.
Skipping the Test Fit
Always test the fabric on the chair before sewing the final seams.
How to Make Matching Covers for Multiple Chairs
If you’re making covers for an entire dining set, create one perfect master pattern first.
Use that pattern to cut all the remaining covers.
This will help keep every chair cover the same size.
For a dining room makeover, you can even mix fabrics while keeping the same pattern.
For example:
- Red gingham for every other chair
- Floral fabric for accent chairs
- Solid cream fabric for the head chairs
This creates a coordinated but personalized look.
Washing and Caring for Your Chair Covers
One of the biggest advantages of a removable chair cover is that it can be washed.
Before making the covers, prewash your fabric.
This is especially important with cotton because it can shrink.
For everyday maintenance:
- Remove the cover regularly.
- Shake out crumbs and dust.
- Follow the fabric’s washing instructions.
- Avoid excessively hot water unless the fabric allows it.
- Iron after washing if necessary.
If you expect frequent washing, use durable cotton and finish all raw edges carefully.
Easy Ways to Customize the Pattern
Once you’ve mastered the basic version, you can modify the design.
Add a Ruffle
Add a gathered ruffle along the bottom edge for a romantic cottage-style chair cover.
Add Piping
Sew piping around the edge of the seat for a more tailored appearance.
Add Contrast Fabric
Use one fabric for the seat and another for the skirt.
Add Embroidery
Personalize the cover with:
- Initials
- Flowers
- Small motifs
- Names
- Decorative embroidery
Add a Bow
A fabric bow at the back can give the chair a more decorative appearance.
Final Thoughts
Making your own DIY chair seat cover is an easy and affordable way to transform ordinary dining chairs. With just a few measurements and basic sewing skills, you can create removable covers that completely change the appearance of a room.
The 45 × 45 cm seat and 12 cm skirt design shown in this tutorial is a great starting point, but the pattern can easily be adjusted for different chair sizes.
The classic gingham version is especially beautiful for farmhouse, country, cottage, kitchen, and dining room décor. You can also experiment with floral fabrics, linen, denim, plaid, or solid colors to create a style that matches your home.
Once you’ve made one, you can use the same basic pattern to create an entire set of matching DIY dining chair covers.