
Heart Quilt Pattern
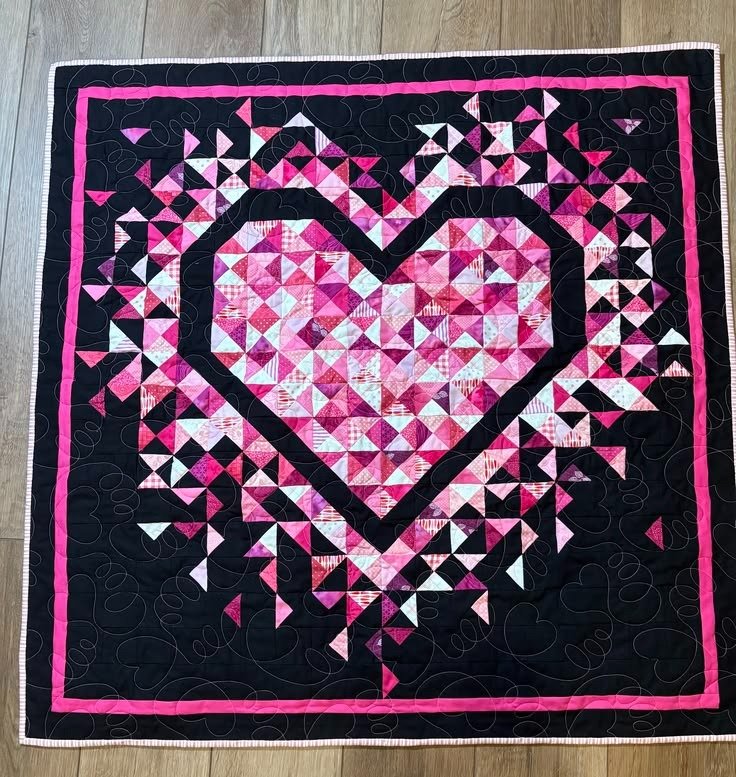
Create a stunning DIY heart quilt with this modern and colorful patchwork design. This beautiful quilt combines a large heart motif with dozens of tiny half-square triangles, creating a striking combination of black, pink, white, and patterned fabrics.
The finished design has a dramatic dark background that makes the colorful heart and surrounding geometric details stand out. It is an excellent project for quilters who enjoy scrap quilting, geometric patchwork, heart quilt patterns, and modern quilting designs.
This tutorial explains how to recreate the overall design while allowing you to choose your own quilt size, colors, and fabric combinations.
Materials
Before beginning your quilt, gather the following supplies:
- Black cotton quilting fabric
- Pink fabric scraps in several shades
- White or cream fabric scraps
- Pink and white patterned fabrics
- Fabric for the quilt backing
- Quilt batting
- Matching sewing thread
- Rotary cutter
- Cutting mat
- Quilting ruler
- Fabric scissors
- Sewing machine
- Iron and ironing board
- Fabric marking pen or pencil
- Quilting pins or clips
- Safety pins or quilt basting spray
- Optional: walking foot
- Optional: free-motion quilting foot
For the border, you can use:
- Pink fabric
- Black fabric
- White fabric
The example uses a black background with bright pink accents, creating a bold modern look.
Step 1: Choose Your Quilt Size
Start by deciding how large you want your finished quilt to be.
This design works particularly well as a square quilt.
Possible sizes include:
- 36 × 36 inches — small wall quilt
- 48 × 48 inches — medium wall quilt
- 60 × 60 inches — lap quilt
- 72 × 72 inches — large throw quilt
- 80 × 80 inches — larger bed quilt
You can scale the design up or down depending on your needs.
For your first attempt, a small wall quilt is easier to manage because there are many small patchwork pieces.
Step 2: Choose a Color Palette
The original design has a very distinctive color palette.
The main colors are:
- Black
- Hot pink
- Light pink
- White
- Pale pink
- Small amounts of patterned fabrics
The black fabric acts as the background.
The pink and white pieces create the heart and the surrounding geometric pattern.
For a completely different appearance, you could replace the pink with:
- Purple
- Blue
- Red
- Orange
- Green
- Teal
- Rainbow colors
The basic design will work with almost any contrasting color combination.
Step 3: Prepare Your Fabric
Wash and dry your quilting cotton before cutting.
This is important because cotton can shrink after washing.
After washing, press the fabric thoroughly.
Cut away loose threads and make sure the fabric is completely flat.
Sort your scraps by color.
Create separate piles for:
- Dark pink
- Light pink
- White
- Patterned fabric
- Black background fabric
Having everything organized before you begin will make the piecing process much easier.
Step 4: Create the Heart Template
The heart is the main feature of this quilt.
You can draw a large heart on paper or create a digital template.
The heart should occupy most of the central area of the quilt.
Instead of making the heart from one solid piece of fabric, the design uses many small geometric pieces.
This is what gives the quilt its unique patchwork appearance.
For a balanced composition, leave a generous black area around the heart.
Step 5: Divide the Heart Into Sections
Divide the heart into smaller sections.
You can create a grid of squares and triangles inside the heart.
The example uses many small triangular pieces arranged in different directions.
You don’t have to reproduce every triangle exactly.
The important elements are:
- A recognizable heart silhouette
- A colorful patchwork interior
- A dark outline around the heart
- Colorful geometric pieces extending outward
This makes the design easier to reproduce while maintaining the overall visual effect.
Step 6: Make Half-Square Triangles
The half-square triangle (HST) is one of the most useful quilt blocks for this project.
To make one:
- Cut two fabric squares of the same size.
- Place them right sides together.
- Draw a diagonal line from one corner to the opposite corner.
- Sew approximately ¼ inch from each side of the marked line.
- Cut directly along the center line.
- Open the two resulting pieces.
- Press the seam toward the darker fabric or open it.
- Trim the block to the desired size.
You now have two half-square triangle units.
Repeat this process with your pink, white, and patterned fabrics.
Step 7: Make Different Sizes of Triangle Units
One of the characteristics of the example is the variety of triangle sizes.
You can make:
- Large HSTs
- Medium HSTs
- Small HSTs
- Tiny accent triangles
Using several sizes gives the quilt a more dynamic appearance.
If you’re a beginner, however, you can simplify the project by using only one or two sizes.
The final design will still look beautiful.
Step 8: Create the Heart Interior
Begin arranging your colorful triangle units inside the heart template.
Mix the colors rather than placing all the pinks together.
For example:
- Place light pink next to dark pink.
- Add white triangles between bright colors.
- Occasionally introduce patterned fabric.
- Rotate some triangles to create movement.
The goal is to create a scrappy patchwork heart.
Don’t worry about perfect symmetry.
The slightly random arrangement is part of the charm of this quilt.
Step 9: Sew the Heart Sections
Once you’re happy with your arrangement, sew the triangle units together in small sections.
Start with rows.
Sew two pieces together.
Press the seam.
Add the next piece.
Continue until you have completed each small section.
Then join the sections together.
Always check that the points of your triangles line up as closely as possible.
Step 10: Create the Black Heart Outline
One of the most important visual elements is the thick black outline surrounding the heart.
Cut strips of black fabric for the outline.
Sew the strips around the patchwork heart.
This creates a strong contrast between the colorful interior and the dark background.
The outline also makes the heart shape much easier to recognize.
Press the seams carefully.
Step 11: Add the Outer Patchwork Pieces
The example doesn’t stop at the heart.
Small pink, white, and patterned triangles extend outward into the black background.
This creates an almost shattered or exploding-heart effect.
To recreate this look, prepare additional HSTs and small triangles.
Arrange them around the outside of the heart.
Some pieces can remain isolated.
Others can form small clusters.
Step 12: Create the Outer Geometric Design
Work around the heart and create several groups of triangles.
Try alternating between:
- Pink
- White
- Black
- Patterned fabric
Leave plenty of black space between the groups.
This contrast is what makes the colorful pieces stand out.
You can create a symmetrical design or make the arrangement completely improvisational.
An improvisational approach is particularly suitable for scrap quilting.
Step 13: Add the Pink Inner Border
The original quilt features a bright pink border surrounding the main composition.
Cut four strips of pink fabric.
The width can be adjusted according to your desired look.
Sew the side borders first.
Press the seams.
Then attach the top and bottom borders.
Measure carefully before cutting the final border pieces so the quilt remains square.
Step 14: Add the Black Outer Border
After adding the pink border, add a wider black border around the outside.
This creates a frame around the colorful design.
The black border also visually connects with the black background surrounding the heart.
Measure the quilt before cutting your border strips.
This will help prevent the final quilt from becoming distorted.
Step 15: Add the Final Binding
The example uses a narrow light-colored binding around the outside edge.
You can use:
- White
- Pale pink
- Black
- Striped fabric
- A contrasting print
Cut your binding strips approximately 2½ inches wide, depending on your preferred binding method.
Join the strips together.
Press them in half lengthwise.
Sew the binding around the front edge of the quilt.
Fold it around to the back and hand-stitch or machine-stitch it into place.
Step 16: Prepare the Quilt Sandwich
Once your quilt top is complete, prepare the three layers:
- Quilt top
- Batting
- Backing fabric
Place the backing fabric face down.
Lay the batting over the backing.
Place the quilt top on top, facing upward.
Smooth everything carefully.
Make sure there are no wrinkles or folds.
Step 17: Baste the Quilt
Secure the three layers together.
You can use:
- Safety pins
- Quilting clips
- Basting spray
- Hand basting stitches
Start in the center and work outward.
This helps prevent the layers from shifting while quilting.
Step 18: Choose Your Quilting Design
The example features decorative free-motion quilting with looping, swirling lines.
This gives the black background a subtle texture without competing with the colorful heart.
You can recreate this effect with:
- Loops
- Swirls
- Hearts
- Curves
- Meandering lines
- Free-motion stippling
If you’re new to free-motion quilting, practice on a scrap sandwich first.
Step 19: Quilt Around the Heart
To make the heart stand out, quilt around its outer edge.
You can stitch approximately ¼–½ inch away from the black heart outline.
This creates definition and makes the central shape appear slightly raised.
Continue quilting the surrounding background.
Avoid putting too much dense quilting inside the colorful heart unless you want a highly textured appearance.
Step 20: Quilt the Borders
For the pink border, you can use simple straight lines.
For the black outer border, try:
- Loops
- Spirals
- Continuous curves
- Small hearts
Keep the quilting consistent with the rest of the design.
Step 21: Trim the Quilt
Once quilting is complete, place the quilt on a large flat surface.
Trim the edges carefully.
Use a quilting ruler and rotary cutter to create straight edges.
Check that all four corners are square.
This step is important before attaching the binding.
Step 22: Finish With Binding
Attach the binding around all four edges.
Sew slowly around the corners.
At each corner:
- Sew toward the corner.
- Stop approximately ¼ inch from the edge.
- Backstitch.
- Fold the binding upward.
- Fold it back down.
- Continue sewing along the next side.
This creates a neat mitered corner.
Tips for Working With Tiny Pieces
This quilt contains many small pieces, so organization is important.
Keep pieces organized
Use small containers or trays for different colors.
Label sections
If your design is complicated, number each section.
Take photographs
Before sewing a section, take a photo of the arrangement.
This makes it much easier to reconstruct if pieces get mixed up.
Don’t chase perfection
Small quilting projects often involve tiny pieces that are difficult to align perfectly.
A handmade quilt doesn’t need to look machine-generated.
How to Make the Quilt Easier
If you love the appearance of this quilt but don’t want to work with hundreds of tiny pieces, simplify the design.
Instead of making extremely small triangles, use larger HST blocks.
For example:
Beginner version:
4–5 inch triangle units
Intermediate version:
2½–3 inch units
Advanced version:
1–2 inch units
The smaller the pieces, the more detailed the finished heart will appear.
Fabric Scraps Are Perfect for This Project
This design is ideal for using leftover fabric.
You don’t need large pieces of every color.
Small scraps are enough to create:
- Tiny triangles
- HST blocks
- Decorative accents
- Small geometric shapes
This makes the project a great scrap quilt pattern.
You can even include scraps from previous sewing projects to make the finished quilt more personal.
Color Ideas
Although the original design uses black and pink, there are many beautiful alternatives.
Red and White
Create a traditional Valentine’s Day heart quilt.
Purple and Black
Perfect for a dramatic, modern quilt.
Blue and White
A cooler and more classic color combination.
Rainbow
Use every color of the rainbow against a black background.
Green and Cream
A beautiful botanical-inspired palette.
Autumn Colors
Combine:
- Rust
- Orange
- Burgundy
- Mustard
- Cream
- Brown
Perfect for Valentine’s Day
Because of its heart motif, this quilt is especially suitable for Valentine’s Day décor.
You can make a smaller version as:
- A wall hanging
- Table topper
- Bed runner
- Cushion cover
- Valentine’s Day gift
Add embroidered initials or a date to personalize it.
Gift Idea
A handmade heart quilt makes a meaningful gift for:
- Weddings
- Anniversaries
- Valentine’s Day
- Birthdays
- Mother’s Day
- Housewarmings
You can even incorporate fabric from meaningful clothing into the patchwork.
This turns the quilt into a sentimental memory quilt.
Final Thoughts
This DIY heart quilt pattern is a fantastic project for quilters who enjoy bold colors, geometric shapes, and creative scrap quilting.
The combination of the dramatic black background, vibrant pink heart, tiny half-square triangles, and decorative quilting creates a modern statement piece that looks far more complicated than it actually needs to be.
You can follow the design closely or use it as inspiration for your own version. Change the colors, make the heart larger or smaller, experiment with different triangle sizes, or add your own embroidery and appliqué details.
The most important thing is to have fun with the fabric.
Every scrap can become part of the design, making your finished quilt completely unique.