
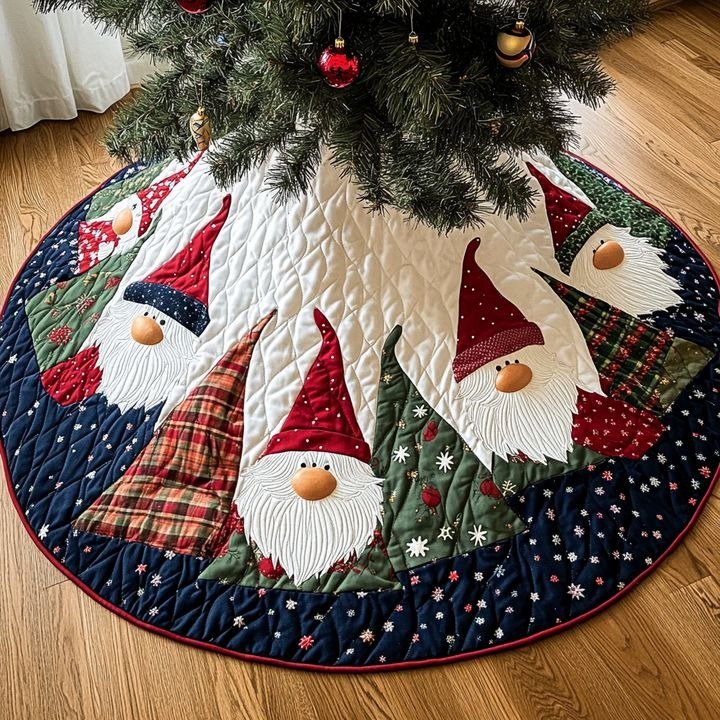
Christmas Tree Skirt
Bring a cozy handmade touch to your holiday décor with this beautiful DIY Christmas tree skirt featuring adorable Scandinavian-inspired gnomes, festive fabrics, and colorful patchwork details.
This Christmas sewing project combines fabric appliqué, quilting, patchwork, and decorative binding to create a festive tree skirt that looks beautiful underneath a Christmas tree. The design can be customized with your favorite holiday fabrics, different gnome styles, and any color palette you love.
It is also a wonderful project for using up Christmas fabric scraps from previous sewing and quilting projects.
Materials You Will Need
Before starting, gather all your sewing supplies.
Main Fabric
You will need:
- White or cream cotton fabric for the center
- Christmas-themed fabrics in red, green, navy, and plaid
- Coordinating fabric for the backing
- Fabric scraps for the gnome appliqués
- Batting or quilt wadding
Sewing Supplies
- Sewing machine
- Rotary cutter
- Cutting mat
- Quilting ruler
- Fabric scissors
- Fabric marking pen
- Sewing pins or clips
- Matching sewing thread
- Embroidery thread
- Iron and ironing board
- Hand-sewing needle
- Optional: fusible web
- Optional: fabric glue
- Optional: walking foot
- Optional: free-motion quilting foot
For Finishing
- Red or contrasting binding fabric
- Optional decorative buttons
- Optional embroidery floss
- Optional fabric paint or markers
Step 1: Decide the Size of Your Christmas Tree Skirt
Before cutting your fabric, decide how large you want your finished tree skirt to be.
A tree skirt can be made in several different sizes.
Common sizes include:
- 36 inches for a small tree
- 48 inches for a medium tree
- 60 inches for a larger Christmas tree
- 72 inches or more for a large floor-standing tree
The design shown in the inspiration image is a generous circular tree skirt with enough room for the gnome appliqués and decorative patchwork.
Choose the size based on the diameter of the bottom branches of your Christmas tree.
Step 2: Create the Circular Pattern
A Christmas tree skirt is essentially a large circle with a smaller opening in the center.
To create your pattern, you can use a measuring tape, string, or a long piece of ribbon as a homemade compass.
Find the center point of your fabric.
Attach the string to a pencil.
Measure half of your desired finished diameter.
For example, for a 48-inch tree skirt, the radius is 24 inches.
Draw a large circle.
Then create a smaller circle in the center for the tree trunk.
The center opening can be adjusted depending on the size of your tree stand.
Step 3: Add the Opening
Unlike a traditional round quilt, a tree skirt needs an opening so it can be placed around the tree trunk.
Draw a straight line from the outside edge toward the center.
This will become the opening.
You can finish the opening with:
- Binding
- Buttons
- Snaps
- Fabric ties
- Velcro
A simple fabric tie is an easy option for beginners.
Step 4: Divide the Skirt Into Sections
The inspiration design uses a combination of a large central area and decorative sections around the outside.
You can divide the circular pattern into several wedge-shaped sections.
For example:
- 6 sections
- 8 sections
- 10 sections
- 12 sections
The more sections you create, the more patchwork opportunities you will have.
For an easier project, eight sections are a good starting point.
Step 5: Choose Your Christmas Color Palette
The example uses a traditional holiday palette.
The main colors are:
- Deep green
- Burgundy red
- Bright red
- Navy blue
- White
- Cream
- Natural beige
- Plaid fabrics
The dark navy outer section provides contrast against the lighter gnome appliqués.
You can recreate this palette or choose your own.
Traditional Christmas
Use:
Red + green + cream + white
Winter Wonderland
Try:
Navy + white + silver + pale blue
Rustic Christmas
Combine:
Burgundy + forest green + cream + brown
Scandinavian Christmas
Use:
Red + white + gray + natural linen
Step 6: Prepare the Fabric
Wash and dry your cotton fabrics before cutting.
Press them carefully with an iron.
This helps prevent shrinkage later.
Sort the fabric scraps by color and pattern.
Keep your Christmas prints together so you can easily choose fabrics while designing the skirt.
Step 7: Cut the Main Skirt Pieces
Transfer your pattern to the fabric.
If you are creating a multi-section patchwork skirt, cut each wedge according to your template.
Label the pieces as you cut them.
For example:
- Section A
- Section B
- Section C
- Section D
This makes it much easier to assemble the skirt correctly.
Step 8: Sew the Patchwork Sections
Place two sections together with their right sides facing.
Sew along the seam.
Press the seam open or toward one side.
Continue adding sections until you have completed the full circle.
Take your time matching the seams.
The finished skirt should lie flat without excessive puckering.
Step 9: Create the Central White Area
The inspiration design features a large light-colored center.
This provides the perfect background for the Christmas gnomes.
Cut the center sections from white or cream fabric.
You can use:
- White cotton
- Cream cotton
- Quilting cotton
- Lightweight linen
The lighter fabric will make the colorful gnomes stand out beautifully.
Step 10: Design the Gnome Appliqués
The gnomes are the main decorative element of this tree skirt.
You can create your own simple gnome templates.
Each gnome can be made from a few basic shapes:
- Hat
- Face
- Beard
- Body
- Arms
- Nose
You can draw the pieces by hand or create paper templates.
The great thing about gnome appliqué is that the shapes don’t need to be perfectly identical.
Different sizes and poses can make the finished tree skirt more playful.
Step 11: Cut the Gnome Pieces
Choose different fabrics for the hats.
For example:
- Red polka dots
- Green Christmas prints
- Red plaid
- Burgundy
- Navy
- Green
Cut the hat shapes first.
Then cut the beard from white fabric.
For the nose, use:
- Beige fabric
- Tan fabric
- Peach fabric
- Small pieces of felt
Finally, cut the body from coordinating Christmas fabrics.
Step 12: Add Fusible Web
If you want the appliqué pieces to stay firmly in position while sewing, use fusible web.
Place the fusible web on the back of the appliqué fabric.
Follow the manufacturer’s instructions for ironing.
Once fused, cut the shape carefully.
Repeat this process for the:
- Hats
- Beards
- Bodies
- Noses
- Other details
Step 13: Arrange the Gnomes
Place the gnome pieces on the cream center of the tree skirt.
Don’t sew anything yet.
Move the gnomes around until you like the composition.
Try using different sizes.
Place some gnomes closer to the outer edge and others closer to the center.
The inspiration design uses gnomes facing different directions, which gives the tree skirt a lively appearance.
Step 14: Attach the Gnome Appliqués
Once you’re happy with the arrangement, attach the pieces.
You can use:
Straight Stitch
Sew around the edges with a regular straight stitch.
Zigzag Stitch
A tight zigzag stitch provides a decorative finished edge.
Satin Stitch
A satin stitch gives a smooth, professional appliqué finish.
Blanket Stitch
A hand-sewn blanket stitch creates a traditional handmade quilting appearance.
Choose the method that best matches your sewing experience.
Step 15: Create the Gnome Beards
The beards are an important part of the design.
Cut the beard shapes from white fabric.
For additional texture, use embroidery thread to stitch lines that imitate individual beard strands.
You can also use:
- White felt
- Fleece
- Faux fur
- Textured cotton
If using a fluffy material, make sure it can be safely washed and securely attached.
Step 16: Add the Gnome Noses
Cut small round or oval pieces of beige or tan fabric.
Place one on each gnome.
Sew around the edge or attach it with appliqué stitching.
You can also use small wooden or fabric buttons, depending on the intended use of the tree skirt.
Step 17: Decorate the Gnome Hats
The hats can be personalized with different fabrics and details.
Try:
- Polka dots
- Plaid
- Snowflakes
- Stars
- Christmas trees
- Stripes
- Solid red
- Solid green
Adding different prints makes each gnome unique.
Step 18: Add Additional Christmas Details
If desired, decorate the background with small appliqué motifs.
You could add:
🎄 Christmas trees
⭐ Stars
❄️ Snowflakes
🎁 Presents
🔔 Bells
🌲 Holly leaves
❤️ Hearts
Keep the details relatively small so they don’t compete with the gnomes.
Step 19: Prepare the Quilt Layers
Once the tree skirt top is completely finished, prepare the three layers:
- Finished quilt top
- Batting
- Backing fabric
Cut the backing and batting slightly larger than the quilt top.
Place the backing face down.
Add the batting.
Place the quilt top on top.
Smooth everything carefully.
Step 20: Baste the Tree Skirt
Secure the three layers using:
- Safety pins
- Quilting clips
- Basting spray
- Hand basting
Work from the center outward.
Make sure there are no wrinkles trapped between the layers.
Step 21: Quilt the Tree Skirt
The example has beautiful decorative quilting across the background.
You can quilt the piece using:
- Diamond quilting
- Curved lines
- Free-motion loops
- Swirls
- Straight lines
- Snowflake motifs
For a beginner-friendly design, diagonal lines crossing in both directions create a simple diamond pattern.
Step 22: Quilt Around the Gnomes
To make the appliqués stand out, avoid quilting directly over the most detailed parts of the gnomes.
Instead, quilt around them.
This technique is called echo quilting or background quilting.
Sew around the contours of the gnomes.
The quilting will make the appliqué areas appear more dimensional.
Step 23: Quilt the Outer Border
The outer navy section can be quilted with a simple repeating design.
Try:
- Snowflakes
- Stars
- Curved lines
- Diamonds
- Loops
If you’re using free-motion quilting, practice the pattern on a scrap piece first.
Step 24: Trim the Tree Skirt
After quilting, trim the entire piece.
Make sure the circular edge is smooth.
Use a large ruler and rotary cutter where possible.
For curved sections, fabric scissors can make it easier to maintain a smooth shape.
Check the center opening as well.
Step 25: Finish the Outer Edge
The example has a narrow red binding around the outside.
This creates a beautiful finishing detail.
Cut your binding strips approximately 2½ inches wide, or adjust according to your preferred binding method.
Join the strips into one continuous piece.
Sew the binding around the outer edge.
Carefully work around the curve.
Step 26: Finish the Center Opening
The central opening also needs to be finished.
You can use the same red binding around the opening.
Fold the binding around the raw edge and stitch it securely.
This creates a clean and durable finish.
Step 27: Add Closures
The opening can be closed using:
- Fabric ties
- Buttons
- Snaps
- Hook-and-loop tape
Fabric ties are particularly attractive because they add another decorative element.
Attach two or three pairs along the opening.
Step 28: Give the Tree Skirt a Final Press
Once all the sewing is complete, carefully press the finished tree skirt.
Avoid flattening heavily textured appliqué unnecessarily.
Pay particular attention to:
- Binding
- Outer edge
- Center opening
- Patchwork seams
Your handmade Christmas tree skirt is now ready to decorate your home.
Tips for Sewing Christmas Appliqué
Use cotton fabric
Quilting cotton is easy to cut, sew, and press.
Prewash everything
This helps avoid unexpected shrinkage.
Use contrasting fabrics
The gnomes will stand out much better against a lighter background.
Keep your templates
Save your gnome templates so you can make matching decorations later.
Don’t worry about perfection
Handmade Christmas décor looks beautiful when it has a little personality and variation.
Easy Ways to Customize the Tree Skirt
You don’t have to recreate the exact design.
Try making:
Santa Tree Skirt
Replace the gnomes with Santa Claus appliqués.
Snowman Tree Skirt
Use snowmen, snowflakes, and winter trees.
Christmas Village
Create tiny houses around the outer circle.
Scandinavian Gnome Skirt
Use simple red, white, and gray fabrics.
Rustic Christmas Skirt
Combine plaid, burlap-inspired fabrics, cream, red, and forest green.
How to Make the Project More Beginner-Friendly
If this project feels complicated, simplify it.
Instead of creating multiple patchwork sections, use one large piece of cream fabric as the center.
Then add the gnomes as appliqués.
Add a simple printed border around the outside.
You can still achieve a beautiful result without constructing the entire skirt from multiple fabric pieces.
Make Matching Christmas Decorations
Once you’ve created the gnome templates, you can use them for other projects.
Make matching:
- Christmas stockings
- Tree ornaments
- Pillow covers
- Table runners
- Christmas wall hangings
- Placemats
- Fabric garlands
- Christmas pillows
Using the same fabrics throughout your decorations can create a beautiful coordinated Christmas theme.
Final Thoughts
This DIY Christmas tree skirt is a wonderful holiday sewing project for anyone who loves quilting, appliqué, and festive home décor.
The combination of colorful Christmas fabrics, a soft cream background, playful gnomes, and decorative quilting creates a cozy handmade piece that can become part of your Christmas decorations for many years.
You can follow the original design closely or create your own version with different gnome styles, colors, fabrics, and quilting patterns.
Because the project uses relatively small pieces of fabric for the appliqué, it is also an excellent way to use up your Christmas fabric scraps.
Make the design as simple or detailed as you like, and enjoy creating a one-of-a-kind piece for your Christmas tree.