
How to Crochet an Adorable Amigurumi Dog
(Easy Beginner-Friendly Guide)
Crocheting an amigurumi dog is one of the most enjoyable projects for both beginners and experienced crochet lovers. These tiny handmade puppies are irresistibly cute, highly customizable, and perfect for gifts, nursery decor, craft fairs, or collectible crochet creations. Whether you want to create a realistic puppy or a cartoon-inspired companion, learning the basics of amigurumi dog patterns opens up endless creative possibilities.
One of the reasons amigurumi dogs are so popular is their versatility. You can easily personalize the breed, ear shape, colors, facial expression, and accessories to make every dog unique. From floppy-eared puppies to tiny pocket-sized dachshunds, the possibilities are almost limitless once you understand the basic construction techniques.
In this beginner-friendly guide, you’ll learn how amigurumi dog patterns are typically made, which materials work best, and the essential tips that help your finished project look clean, professional, and adorable.
What Is an Amigurumi Dog?
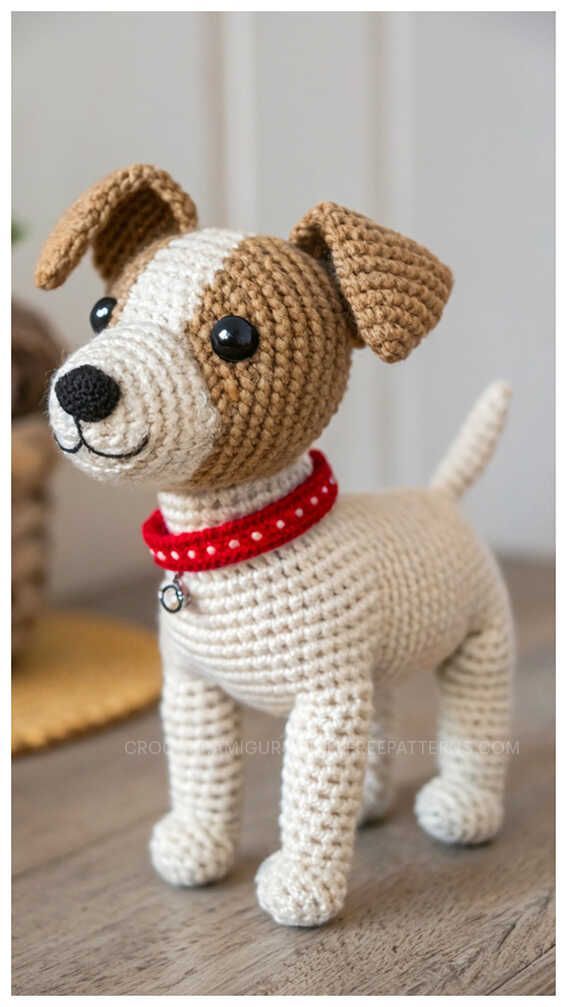
An amigurumi dog is a stuffed crochet toy created using small, tight stitches worked in continuous rounds. Most patterns are built from several separate pieces such as:
- Head
- Body
- Legs
- Tail
- Ears
- Snout
After crocheting each section individually, the pieces are stuffed and sewn together to create a three-dimensional dog figure.
Amigurumi dogs can range from realistic breeds to cute cartoon animals with oversized heads and tiny limbs. Their charm comes from small details and expressive shaping.
Materials You’ll Need
Before starting your crochet dog, gather these basic supplies:
- Cotton or acrylic yarn
- Crochet hook (typically 2.0 mm–3.5 mm)
- Polyester fiberfill stuffing
- Stitch markers
- Yarn needle
- Scissors
- Safety eyes or black embroidery thread
- Pins for assembly
- Optional felt, ribbon, or tiny accessories
Cotton yarn is often preferred because it creates crisp stitches and better shape definition, while acrylic yarn gives a softer and fluffier appearance.
Basic Crochet Stitches Used
Most amigurumi dog patterns use only a few beginner-friendly stitches:
- Magic ring
- Single crochet (SC)
- Increase (INC)
- Invisible decrease (DEC)
- Slip stitch (SL ST)
Once you feel comfortable with these techniques, creating simple amigurumi animals becomes much easier.
Step-by-Step Amigurumi Dog Pattern Explanation
1. Crochet the Head
The head is usually started with a magic ring and expanded gradually using increases.
Typical process:
- Begin with 6 single crochets in a magic ring
- Increase evenly every round
- Continue until the desired head size is reached
- Crochet several rounds without increasing
- Decrease slowly to close the shape
Stuff the head firmly but not excessively. Overstuffing may stretch the stitches and expose the filling.
2. Make the Body
Most crochet dogs use a rounded or oval-shaped body.
The body is usually:
- Slightly smaller than the head
- Firmly stuffed for stability
- Crocheted in continuous rounds
Some patterns create the head and body as one piece, while others sew them together afterward.
3. Crochet the Legs and Tail
The legs are generally simple tube shapes with minimal shaping.
Helpful tips:
- Lightly stuff the upper part of the legs
- Keep the lower section flexible
- Pin legs before sewing for symmetry
The tail can be short, curly, long, or fluffy depending on the style of dog you want to create.
4. Add Ears and Snout
Ears are one of the most important features because they define the dog’s personality and breed style.
Popular ear styles include:
- Floppy ears
- Pointed ears
- Rounded puppy ears
The snout is often crocheted separately and sewn onto the face to give dimension and expression.
5. Attach the Facial Features
This step brings your amigurumi dog to life.
You can use:
- Safety eyes for a polished appearance
- Embroidered eyes for a softer handmade style
- Black yarn for the nose and mouth
Adding tiny blush details or eyebrows can make the expression even more charming.
Helpful Tips for Better Amigurumi Dogs
Use Tight Stitches
Tight stitches help prevent stuffing from showing through gaps in the crochet fabric.
Keep Proportions Balanced
Large heads and smaller bodies often create a cuter “kawaii” appearance.
Pin Everything Before Sewing
Always pin ears, legs, and tails before permanently attaching them.
Stuff Gradually
Adding stuffing slowly helps prevent lumps and uneven shaping.
Practice Consistent Tension
Even stitch tension creates smoother, more professional-looking results.
Common Beginner Mistakes
When making amigurumi animals, beginners often struggle with:
- Loose stitches
- Crooked assembly
- Uneven stuffing
- Incorrect stitch counts
- Misplaced facial features
These mistakes are completely normal while learning. Each project improves your technique and confidence.
Final Thoughts
Creating an amigurumi dog is a fun and rewarding crochet project that combines creativity with practical crochet skills. Once you complete your first puppy, you’ll likely want to experiment with different breeds, colors, and accessories.
The beauty of amigurumi is that every handmade dog develops its own personality through small details and finishing touches. With patience and practice, even beginners can create adorable crochet dogs that look professional and unique.
Whether you make them for gifts, decorations, or to sell online, amigurumi dogs remain one of the most loved and timeless crochet projects for all skill levels.