The Log Cabin Quilt
The Log Cabin Quilt
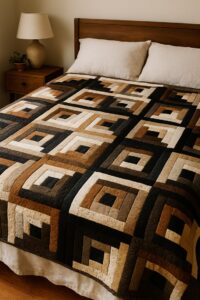
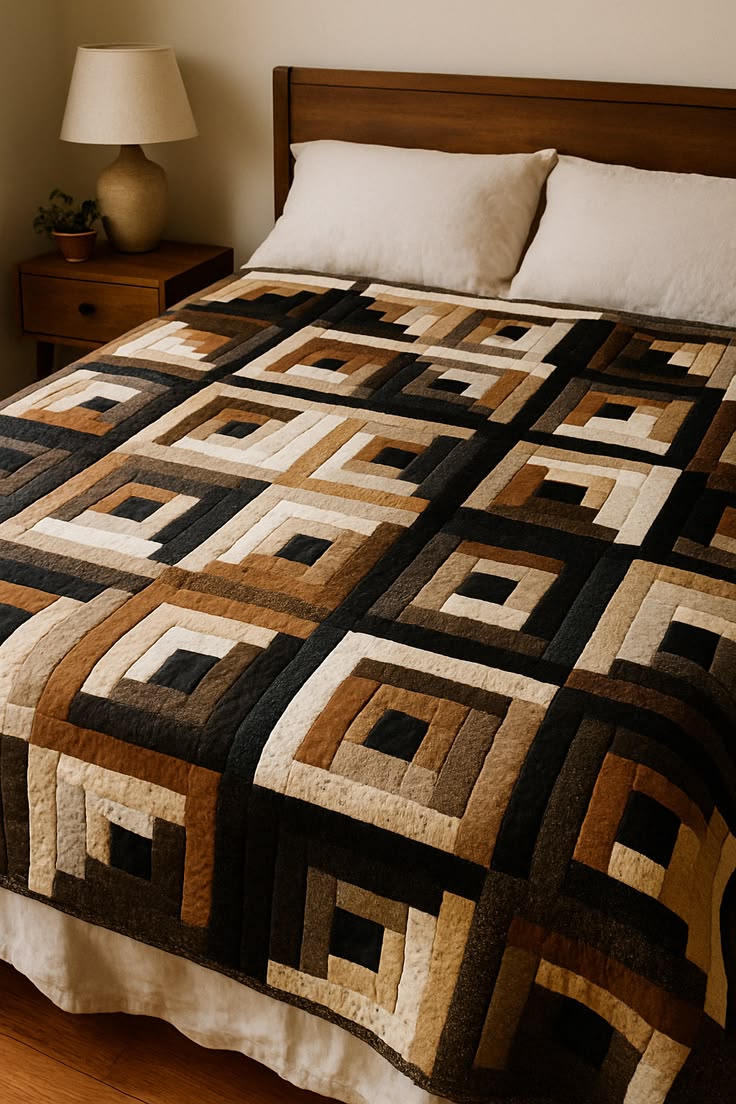
The Log Cabin is one of the oldest and most recognizable quilt blocks in American quilting. It is constructed by sewing strips of fabric around a central square, one strip at a time, creating the appearance of logs surrounding the hearth of a cabin.
Although simple in construction, the Log Cabin is incredibly versatile. By rotating individual blocks before sewing them together, quilters can create dozens of different quilt layouts and visual effects.
History
The Log Cabin block became especially popular in the United States during the mid-19th century, particularly around the American Civil War. Traditionally, the center square represented the fireplace or hearth of a log cabin.
Historically:
- Red center = fireplace (hearth)
- Yellow center = light from the fire
- Light fabrics = daylight
- Dark fabrics = shadows
Modern Log Cabin quilts often use any color combination while preserving the same construction method.
Quilting Vocabulary
| Term | Definition |
|---|---|
| Block | One individual quilt unit. |
| Quilt Top | The finished patchwork before quilting. |
| Center Square | The square that begins the block. |
| Log | Each strip sewn around the center square. |
| Round | One complete cycle of four logs around the center. |
| Seam Allowance | The distance between the stitching line and the fabric edge. |
| Quarter-Inch Seam | The standard ¼” seam allowance used in quilting. |
| Press | To flatten seams with an iron. |
| Finger Press | Flattening seams with your fingers before ironing. |
| Square Up | Trimming a block until all sides are perfectly square. |
| Grain | The direction of the fabric threads. |
| Selvage | The finished edge of the fabric. |
| WOF (Width of Fabric) | The usable width of quilting cotton, usually about 42–44 inches. |
| RST (Right Sides Together) | Place the printed sides of two fabrics facing each other before sewing. |
| Stitch Length | The length of each stitch, usually 2.0–2.2 mm for piecing. |
Materials
Fabric
For a traditional Log Cabin block, you will need:
- One light fabric
- One dark fabric
- One fabric for the center square
Alternatively, you may use:
- Scraps
- Fat Quarters
- Jelly Rolls
- Layer Cakes (after cutting strips)
Recommended Fabric
100% quilting cotton
Examples include:
- Kona Cotton
- Moda Bella Solids
- Riley Blake Confetti Cotton
- Robert Kaufman Kona
- Art Gallery Fabrics Pure Solids
Tools
Essential tools include:
- Sewing machine
- Rotary cutter (45 mm)
- Self-healing cutting mat
- Acrylic quilting ruler
- Steam iron
- Ironing board
- Fine pins or quilting clips
- Cotton or polyester thread
- Fabric scissors
- Seam ripper
Optional but highly recommended:
- Quarter-inch presser foot
- Rotating cutting mat
- Wool pressing mat
- Tailor’s clapper
Fabric Preparation
- Wash fabric only if desired (many quilters prefer not to prewash quilting cotton).
- Press all fabrics thoroughly.
- Square the fabric before cutting.
- Align the ruler carefully with the fabric grain.
Finished Size vs. Unfinished Size
This is one of the most important concepts in quilting.
A Finished Size refers to the size of a block after it has been sewn into the quilt.
An Unfinished Size includes the seam allowances.
For example:
| Finished Size | Unfinished Size |
|---|---|
| 12″ | 12½” |
| 10″ | 10½” |
| 8″ | 8½” |
The extra ½ inch accounts for the ¼-inch seam allowance on all four sides.
Standard Seam Allowance
Always use a ¼-inch seam allowance.
Accuracy is essential. Even a difference of 1⁄16 inch in each seam can cause the final block to become distorted.
Cutting Instructions (12″ Finished Block)
Center Square
Cut:
- 1 square measuring 2½” × 2½”
Light Logs
Cut:
- 1 strip: 2½” × 2½”
- 1 strip: 2½” × 6½”
- 1 strip: 2½” × 10½”
- 1 strip: 2½” × 14½”
- 1 strip: 2½” × 18½”
Dark Logs
Cut:
- 1 strip: 2½” × 4½”
- 1 strip: 2½” × 8½”
- 1 strip: 2½” × 12½”
- 1 strip: 2½” × 16½”
- 1 strip: 2½” × 20½”
These measurements include the seam allowances and produce one unfinished block measuring 12½” × 12½”.
Sewing Order
A Log Cabin block is built in a continuous spiral.
Step 1
Place the first light log on one side of the center square.
Right sides together.
Sew using a ¼-inch seam.
Press the seam toward the log.
Step 2
Add the first dark log to the adjacent side.
Sew.
Press.
Step 3
Continue adding one light log.
Press.
Step 4
Add one dark log.
Press.
At this point, you have completed the first round.
Continue Building the Block
Repeat the same sequence:
- Light
- Dark
- Light
- Dark
Each new strip is longer than the previous one because the block grows after every seam.
Always sew around the block in the same direction (clockwise or counterclockwise) to maintain consistency.
Pressing Tips
Professional quilters recommend:
- Press after every seam.
- Lift and lower the iron rather than sliding it to avoid stretching the fabric.
- Press seams toward the newly added strip unless your pattern specifies otherwise.
Squaring Up
Once all logs have been added:
- Place the block on a cutting mat.
- Align the 12½” markings on your ruler with the block.
- Trim any excess fabric from all four sides.
- Ensure all corners are 90°.
This process is called squaring up and helps ensure that all blocks fit together accurately.
Common Beginner Mistakes
- Using an inconsistent seam allowance.
- Forgetting to press after each seam.
- Stretching the fabric while pressing.
- Cutting strips inaccurately.
- Sewing logs in the wrong order.
- Trimming the block too early.
- Ignoring fabric grain.
Layout Possibilities
One of the greatest strengths of the Log Cabin block is its versatility. By rotating blocks before joining them, you can create many classic quilt layouts, including:
- Straight Furrows
- Barn Raising
- Sunshine and Shadow
- Fields and Furrows
- Streak of Lightning
- Courthouse Steps (a closely related variation)
- Chevron
- Zigzag
- Pinwheel
- Diamond
- Windmill
Each layout uses the same basic block but achieves a completely different visual effect through block orientation.